
Campaign Influence reporting in Salesforce enables users to prove Return on Marketing Investment by mapping the impact of your marketing campaigns, and how much they influence your sales pipeline. This is a great way for marketers to measure ROI when it comes to analyzing which marketing touchpoints within a campaign have contributed to new deals and Sales-won Opportunities.
When looking at using out-of-the-box Opportunity Reports available to end-users in your Marketing Automation tool such as Marketo, Pardot or Hubspot, one of the most common issues is that the reports are either empty or show inaccurate information because the contacts are not connected to Opportunities.
In this article we will describe:
- Why all Salesforce Opportunities must have a Contact Role.
- How to build a solution step-by-step using Salesforce Flow Builder.
Part 1: Syncing Salesforce Opportunity data related to Contacts with your Marketing Automation tool
Why are Salesforce Opportunities with related Contacts important for Marketing Automation?
Summary: Syncing Salesforce Opportunity data with their related Opportunities helps marketers build a personalized marketing experience and accurately measure marketing influence.
With Campaign Influence enabled in Salesforce, this feature offers three standard influence models: First Touch, Last Touch and Even Touch. Syncing Salesforce Contact Opportunity data with Marketing Automation not only enables reporting, but also marketers to segment and personalize marketing efforts.
For example, Opportunity data can be used to stop marketing communication at a certain stage, or Contacts who are Closed-Won could be pushed to a nurture program for Upselling or Cross-selling.
What data links are needed for accurate Campaign Influence reporting?
Summary: Contacts need to be linked to Campaigns (via Campaign Members) and Opportunities (via Contact Roles) in Salesforce for Campaign Influence reports to show accurate data.
For Campaign Influence reporting to work properly, the following needs to be linked in Salesforce:
- Contacts need to be linked to Campaigns (via Campaign Members)
- Contacts need to be linked to Opportunities (via Contact Roles)
Not only does linking between Contacts and Opportunities via Contact Roles have a positive impact on marketing insights and efforts, but it can also have a positive impact on the sales process.
In the recognized sales methodology 'MEDDIC', it’s important that sales representatives are familiar with the titles and roles of potential customers who make product-related decisions. Talking to a technical buyer is more likely to get a sales representative further in the Opportunity sales process, rather than talking to an account manager.
Incorporating this way of working and thinking into the sales process can make sales representatives more conscious about who they should speak to when working with their Opportunities.
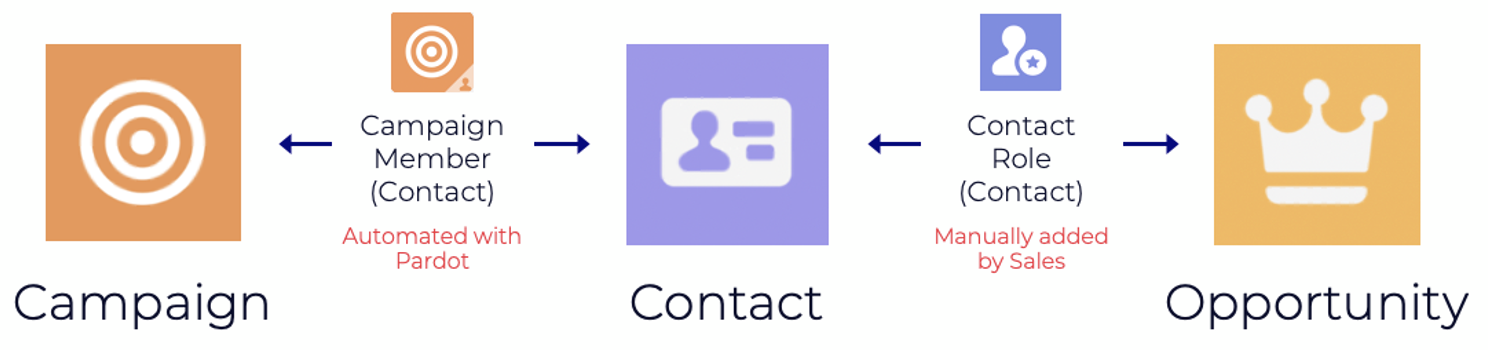
How are Opportunities and Contacts related to each other in Salesforce?
Summary: In Salesforce, Contacts and Opportunities are related to each other via Contact Roles.
To be able to sync a Contact's related Opportunity data to your Marketing Automation tool, it’s important to understand the relationship between Contacts and Opportunities in Salesforce.
There is no direct relationship between Contacts and Opportunities in Salesforce.
Opportunities have a relationship with Accounts, and Accounts have a relationship with Contacts. The standard Object ‘Opportunity Contact Role’ creates a link between Contacts and Opportunities, and it defines the role or level of influence that Contacts play in an Opportunity.
Syncing Salesforce Opportunity data to Marketing Automation tools
Summary: Users must add at least one Contact Role to an Opportunity in Salesforce.
Salesforce Opportunities will sync with Pardot only if they have at least one Opportunity Contact Role related to them that is a Contact Record syncing with a Prospect record in Pardot. This means that to be able to sync data from Opportunities related to a Contact, to a Prospect in Pardot, users must add at least one Contact Role to an Opportunity.
Ensuring users add Contact Roles to their Opportunities
Summary: Train and encourage users to create Opportunities from the Contact Object, or preferably implement a system solution that enforces users to add Contact Roles.
There are some different options for ensuring Contact Roles are related to Opportunities in Salesforce, and in this article, we will later be describing step-by-step how we have implemented a solution for this for one of our clients.
Option 1: Encourage users to go to the Contact Object and create Opportunities from there. That way the Contact will be added to the Opportunity as a Primary Opportunity Contact Role.
However, this requires sufficient training, and there is no good way to ensure users follow this way of working without manually monitoring the Opportunities to ensure they have related Contact Roles. One of the reasons for using Salesforce is of course to avoid and replace administrative tasks to the extent possible, so this option is not recommended.
Option 2: Put the system's capabilities into use and let it proactively support your users by enforcing them to add Contact Roles to their Opportunities. This option requires some custom development, and there are different ways to do it.
When building this solution for one of our clients, we explored some different options such as Apex, AppExchange apps, Process Builder and Flow Builder.
For this client use case, two Record-Triggered Flows and a Validation Rule met their listed requirements, so that is the solution build we will describe step-by-step.
What the final product looks like after implementation
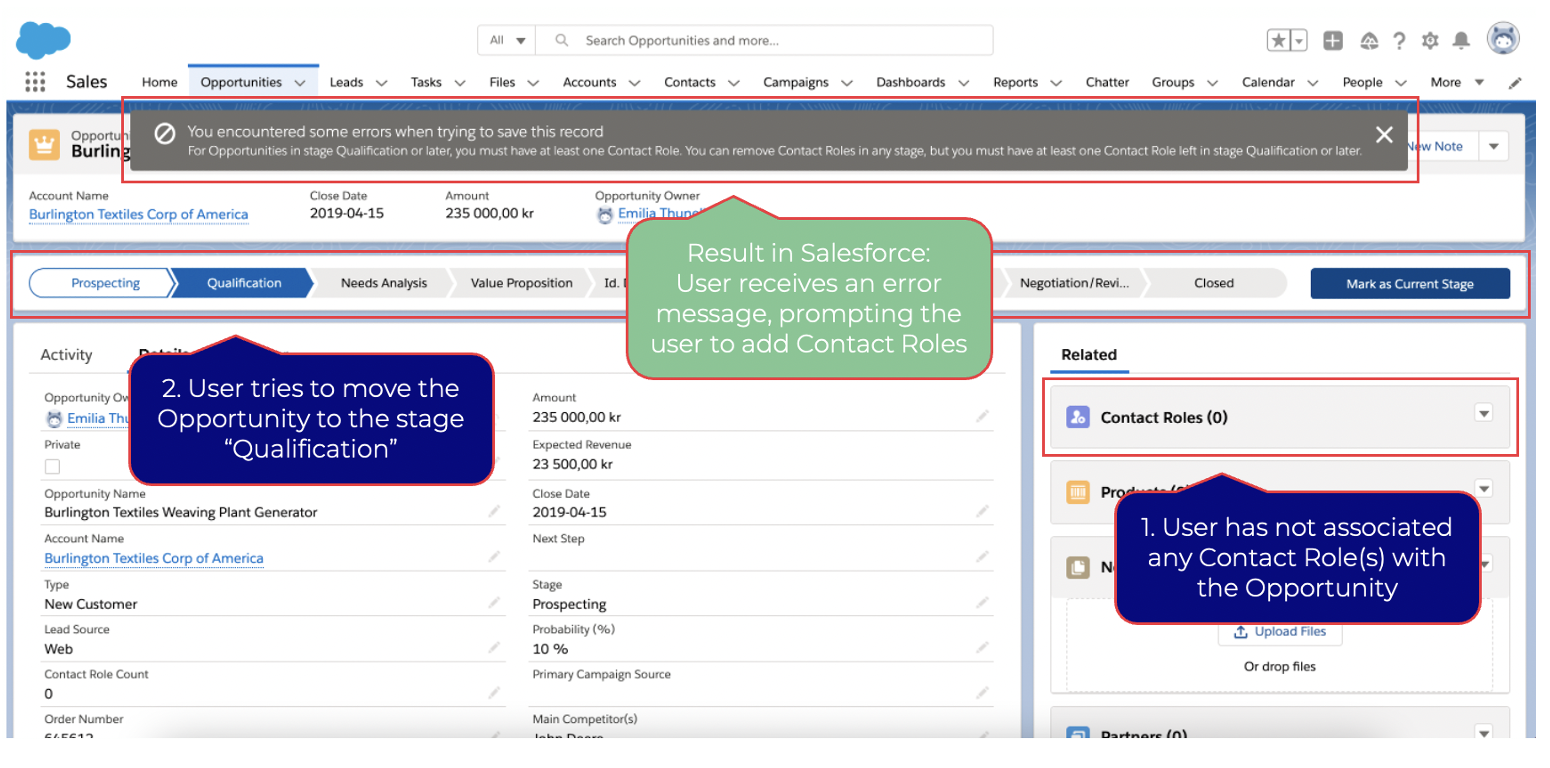
Negative scenario: User tries to move an Opportunity to the Qualification stage without any associated Contact Role(s).
- The user has not associated any Contact Role(s) with the Opportunity
- The user tries to move the Opportunity to the Qualification stage
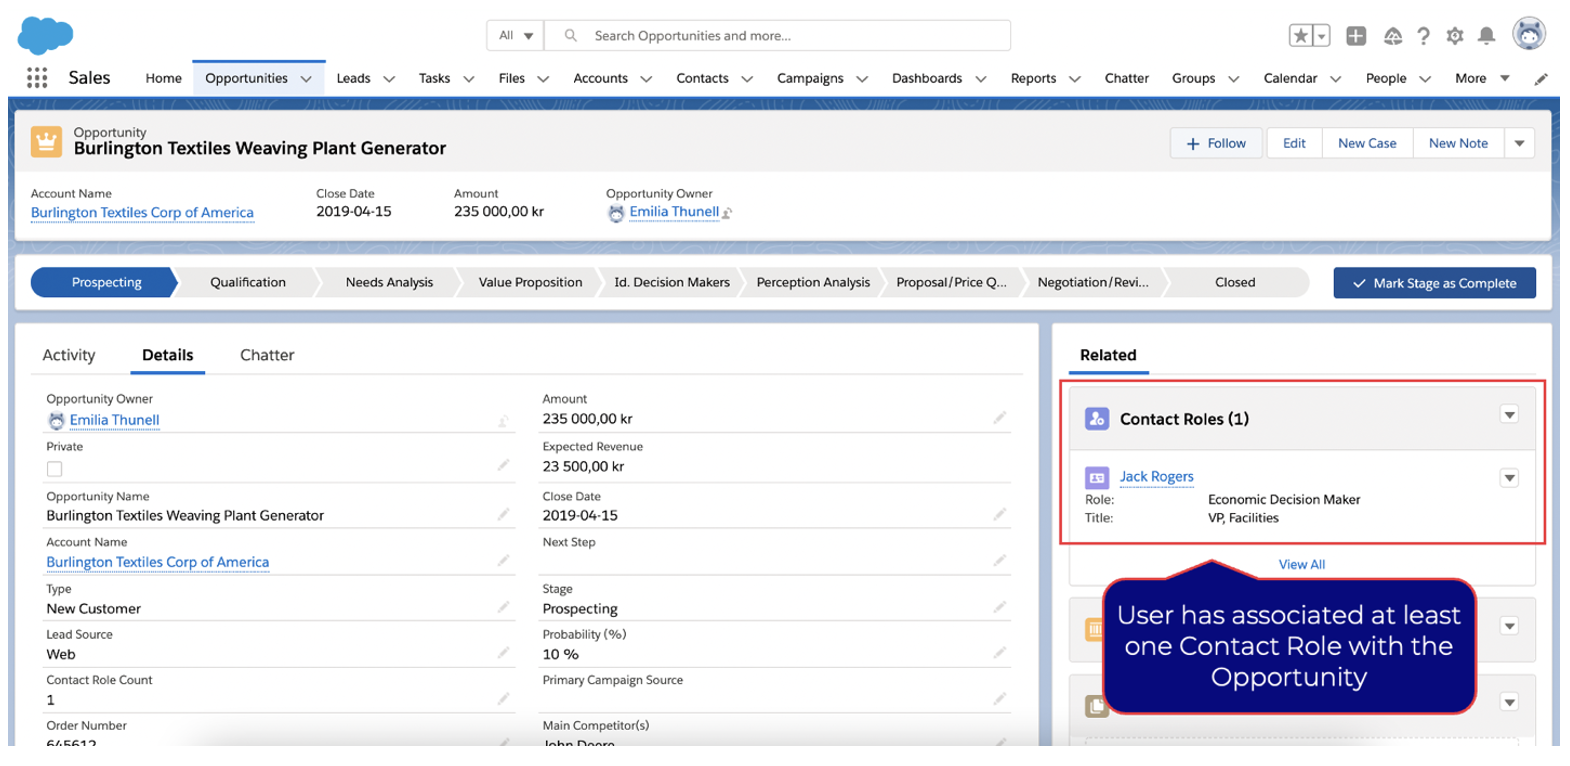
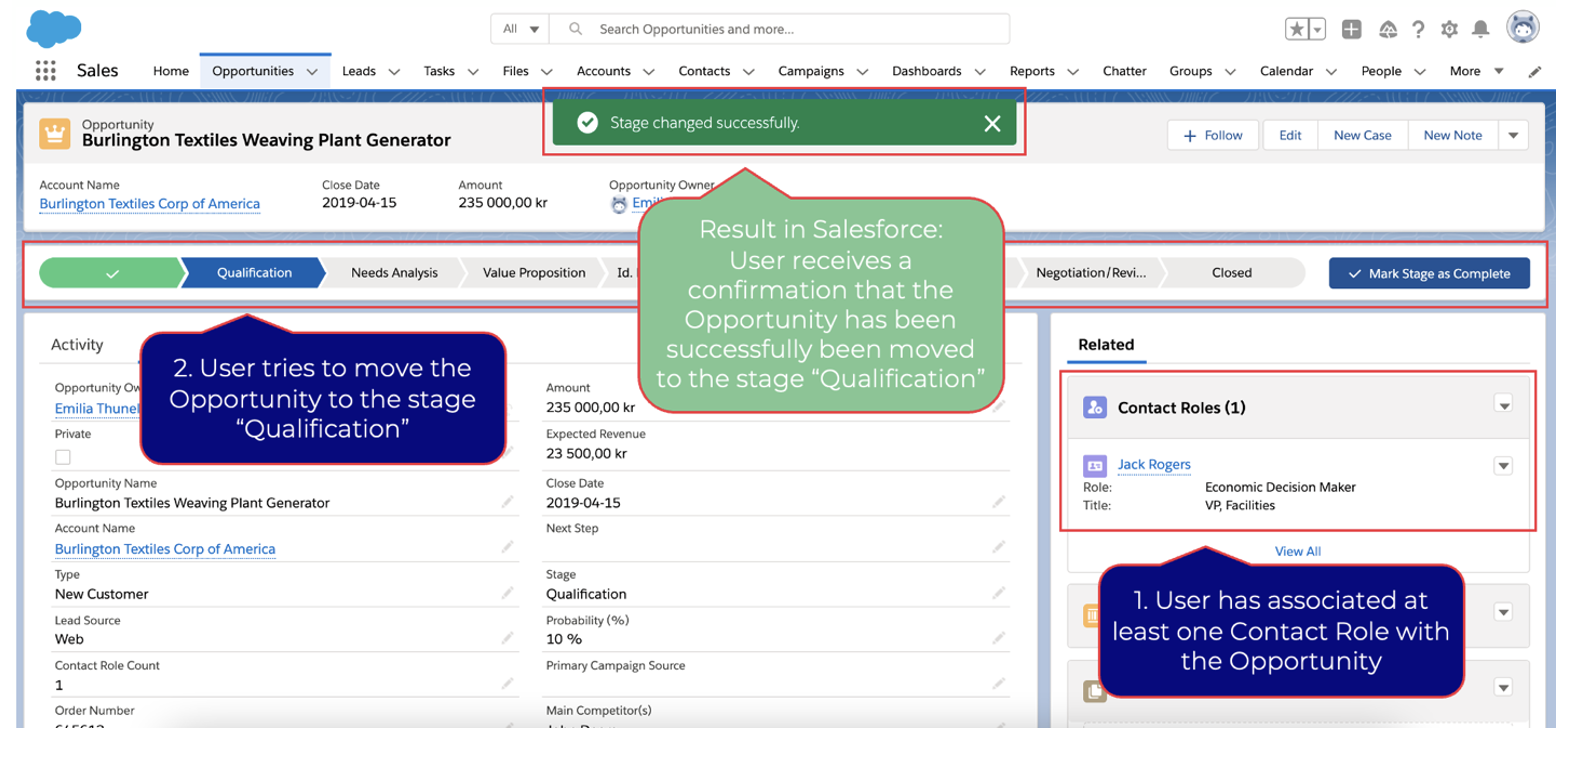
Positive scenario: User tries to move an Opportunity to the Qualification stage with at least one associated Contact Role.
- User associates at least one Contact Role with the Opportunity
- User tries to move the Opportunity to the Qualification stage
Part 2: Building a solution step-by-step using Salesforce Flow Builder
Building a solution that enforces users to add at least one Contact Role to their Opportunities before proceeding to a certain Opportunity stage.
If you are looking to make adding related Objects required on another Object, the logic behind this solution may be helpful. The solution is built in Salesforce using Declarative Programming. Declarative Programming denotes the kind of click or drag-and-drop solution that allows someone without coding knowledge to build an application.
Outlined requirements and technical solution overview
In this specific case, we will describe how to ensure that sales representatives add at least one Opportunity Contact Role to their Opportunities before moving their Opportunities to the Qualification stage by using Flow Builder and Validation rules in Salesforce. For this solution to meet our clients' requirements, the Opportunity Contact Role should not have to be marked as Primary.
Summary of client requirements:
- Sales representatives must add at least one Opportunity Contact Role to their Opportunities before proceeding to the Qualification stage, or any later stage.
- Sales representatives should not be able to remove all Contact Roles in the Qualification stage, or any later stage (at least one Contact Role must still be associated with the Opportunity).
- When a sales representative removes an Opportunity Contact Role from an Opportunity, this must be considered in the logic (this might sound obvious, however surprisingly many resources online do not take this scenario into account. And as a matter of fact, none of the resources we came across while building this solution mentioned this common mistake).
- The Opportunity Contact Role should not have to be marked as Primary (this requirement was the reason no AppExchange Apps fulfilled the client’s need, and we built a custom solution instead.
A summary of the technical solution:
- Create a number field ‘Contact Role Count’ on the Opportunity Object.
- Build two Record-Triggered Flows using Salesforce Flow Builder:
a. One that updates the number field when an Opportunity Contact Role is added to an Opportunity.
b. And another that updates the number field when an Opportunity Contact Role is removed from an Opportunity.
- Create a Validation Rule that validates that the number field is not null or 0 in the Qualification stage, or any later stage.
*Note: Trigger a Flow to run after a record is saved with Record-Triggered Flows
Since the Salesforce Summer ‘20 Release, it is possible to trigger Flows to run after a record is saved using Record-Triggered Flows. Perhaps you’re familiar with Process Builder and using a record-change process to execute actions, such as sending an email every time a new account is created. An after-save Record-Triggered Flow can accomplish that same goal, but with these added benefits:
- You can choose to trigger the Flow to run only when records are updated. This option isn’t available for record-change processes.
- Unlike processes built in Process Builder, Flows have a standard list view, so you can organize and adjust your view to your liking.
- You can access other objects’ records and execute loops.
Read more about this functionality in Salesforce’s Summer ‘20 Release Notes.
Setting up the Technical Solution
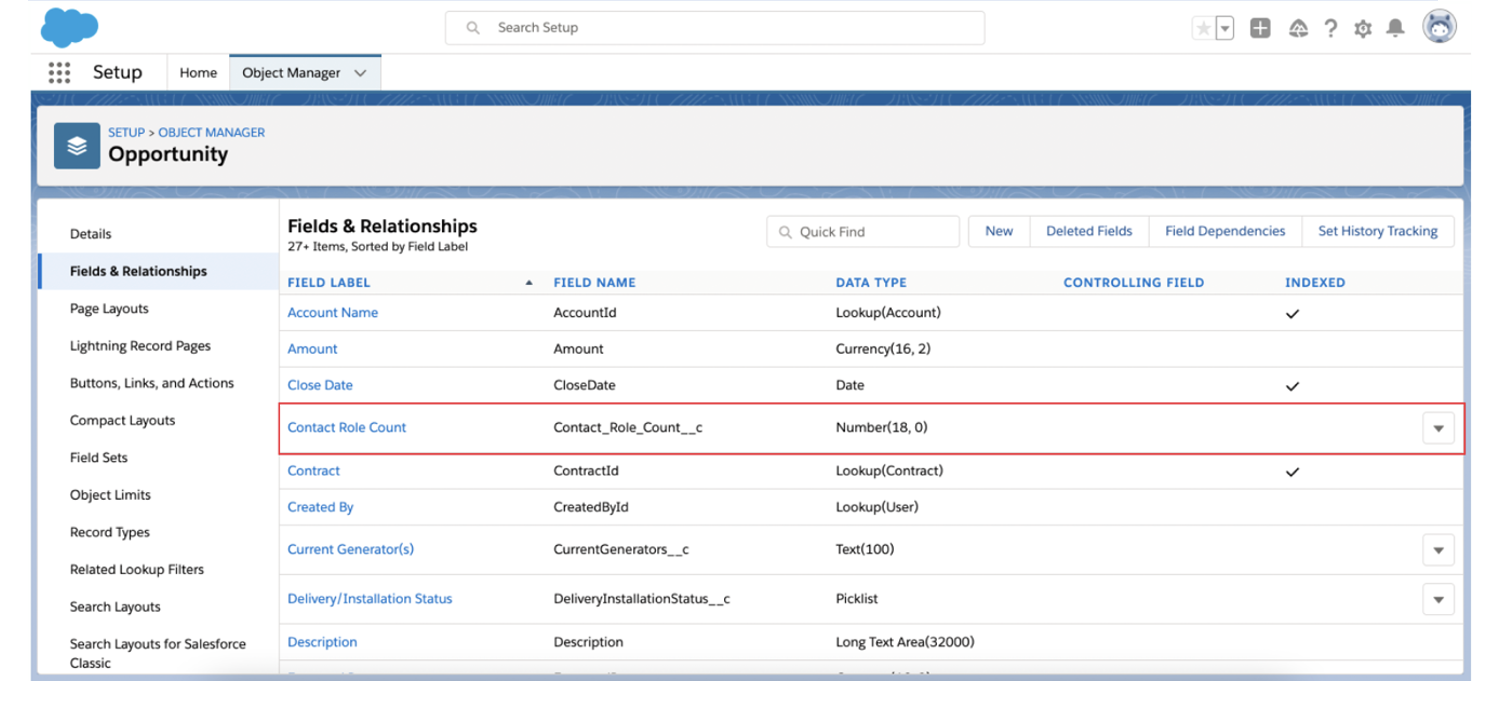
Step 1: Create a number field on the Opportunity
1.1 Create a Number field on the Opportunity Object and name it ‘Contact Role Count.’ This field will be updated with the Flows that will be created later in this article, keeping count of how many Contact Role records are associated with an Opportunity (also called a Roll-up summary field).
Step 2: Create a Flow that updates the number field when an Opportunity Contact Role is added to an Opportunity
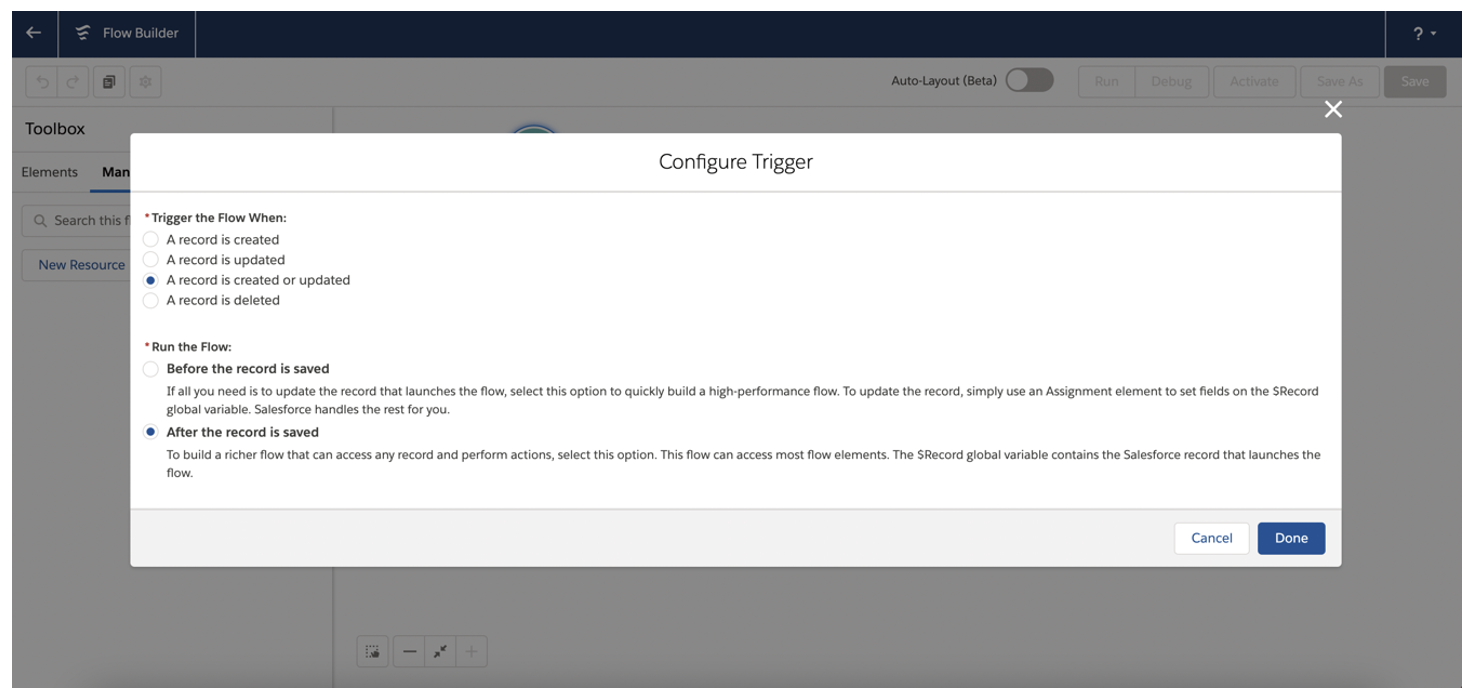
2.1 First, create a Record-Triggered Flow.

2.2 Configure the trigger and choose the Object in the ‘Start’ Element:
- Trigger the Flow when a record is created or updated
- Run the Flow: After the record is saved
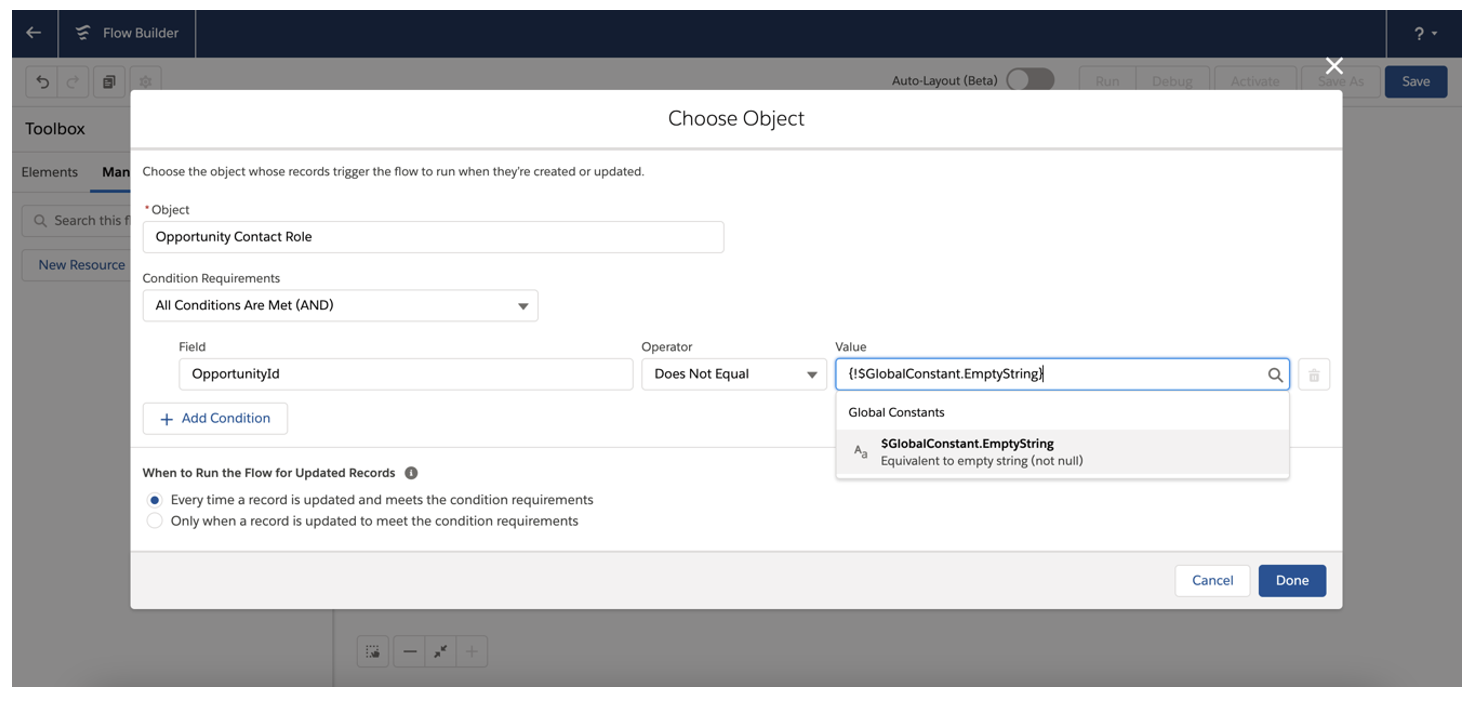
- Object: Opportunity Contact Role
- Condition Requirements: All Conditions Are Met (AND)
- Field: OpportunityId
- Operator: Does Not Equal
- Value: {!$GlobalConstant.EmptyString}
*When to Run the Flow for Updated Records: Every time a record is updated and meets the condition requirements.
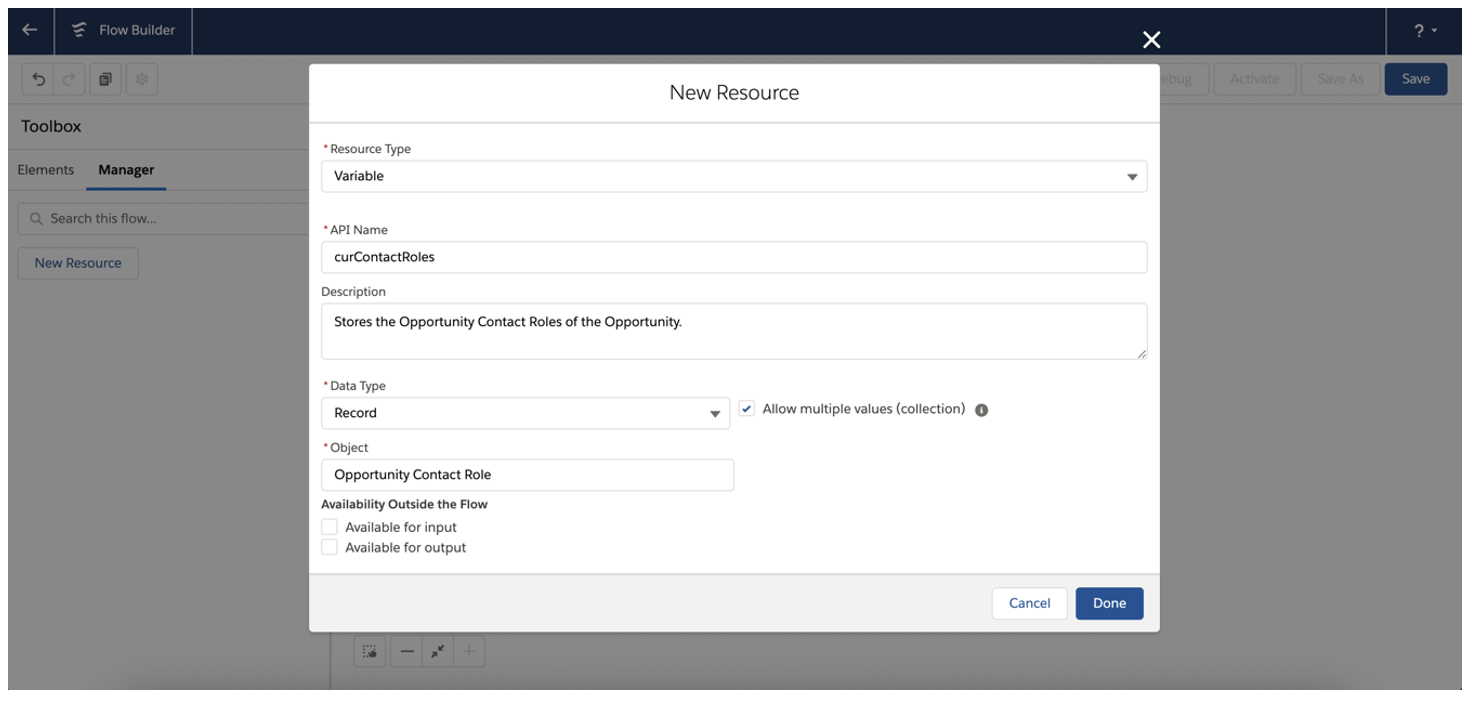
2.3 Create the following Variables by going to the Manager tab and clicking ‘New Resource’ for each new Variable:
A Record Collection Variable will be used to store the Opportunity Contact Roles of the Opportunity:
- Resource Type: Variable
- API Name: curContactRoles
- Description: Stores the Opportunity Contact Roles of the Opportunity
- Data type: Record
- Object: Opportunity Contact Role
- Check the box for ‘Allow multiple values (collection)’
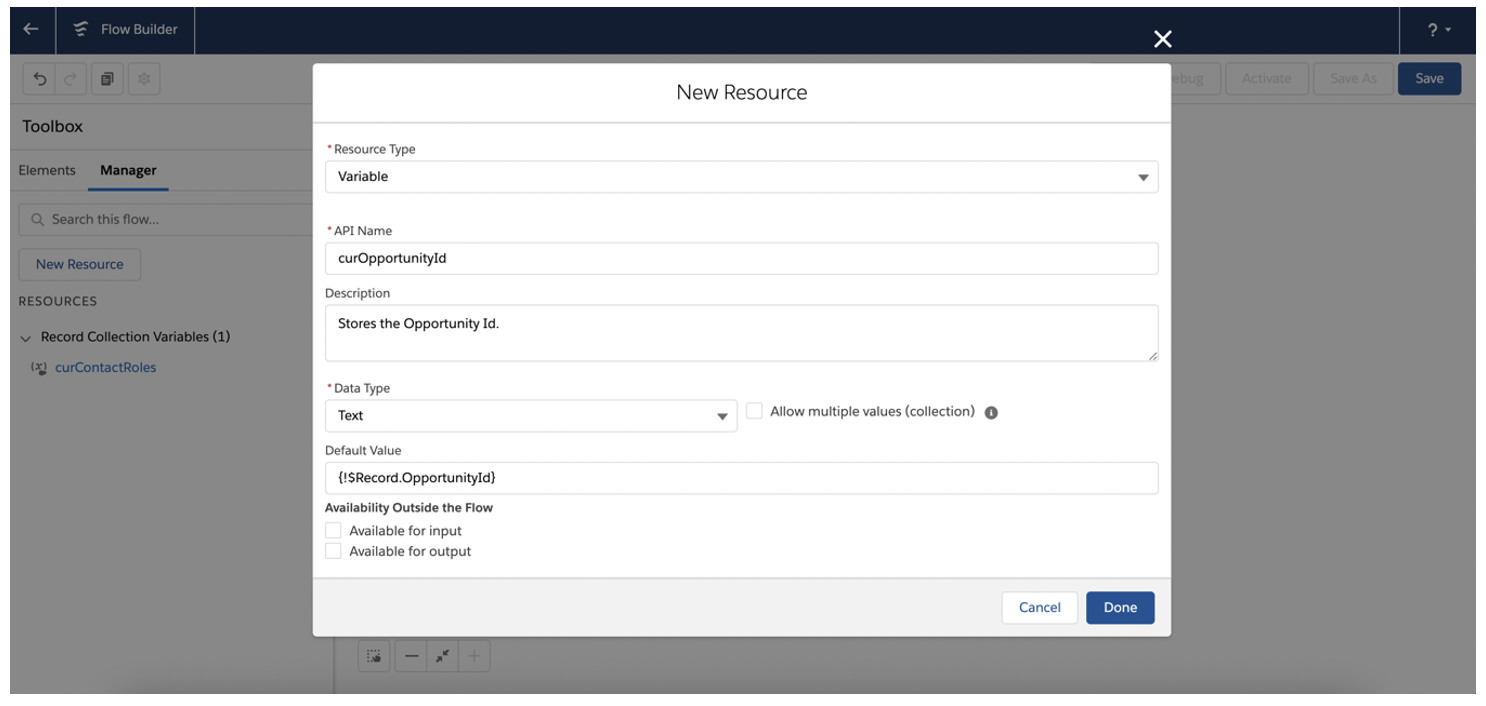
A Variable that will store the Opportunity Id:
- Resource Type: Variable
- API Name: curOpportunityId
- Description: Stores the Opportunity Id
- Data type: Text
- Default Value: {!$Record.OpportunityId}
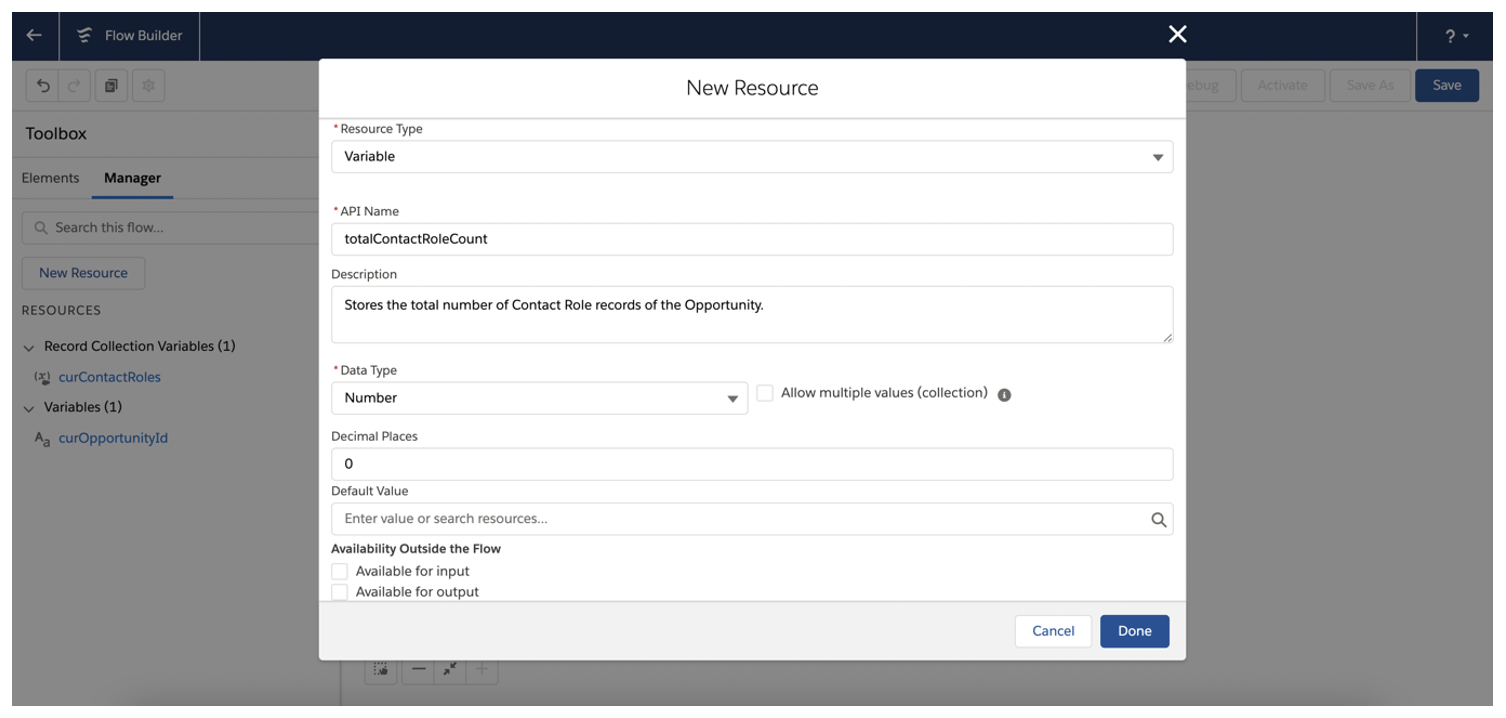
A Variable that stores the total number of Contact Role records of the Opportunity:
- Resource Type: Variable
- API Name: totalContactRoleCount
- Description: Stores the total number of Contact Role records of the Opportunity
- Data Type: Number
- Decimal Places: 0
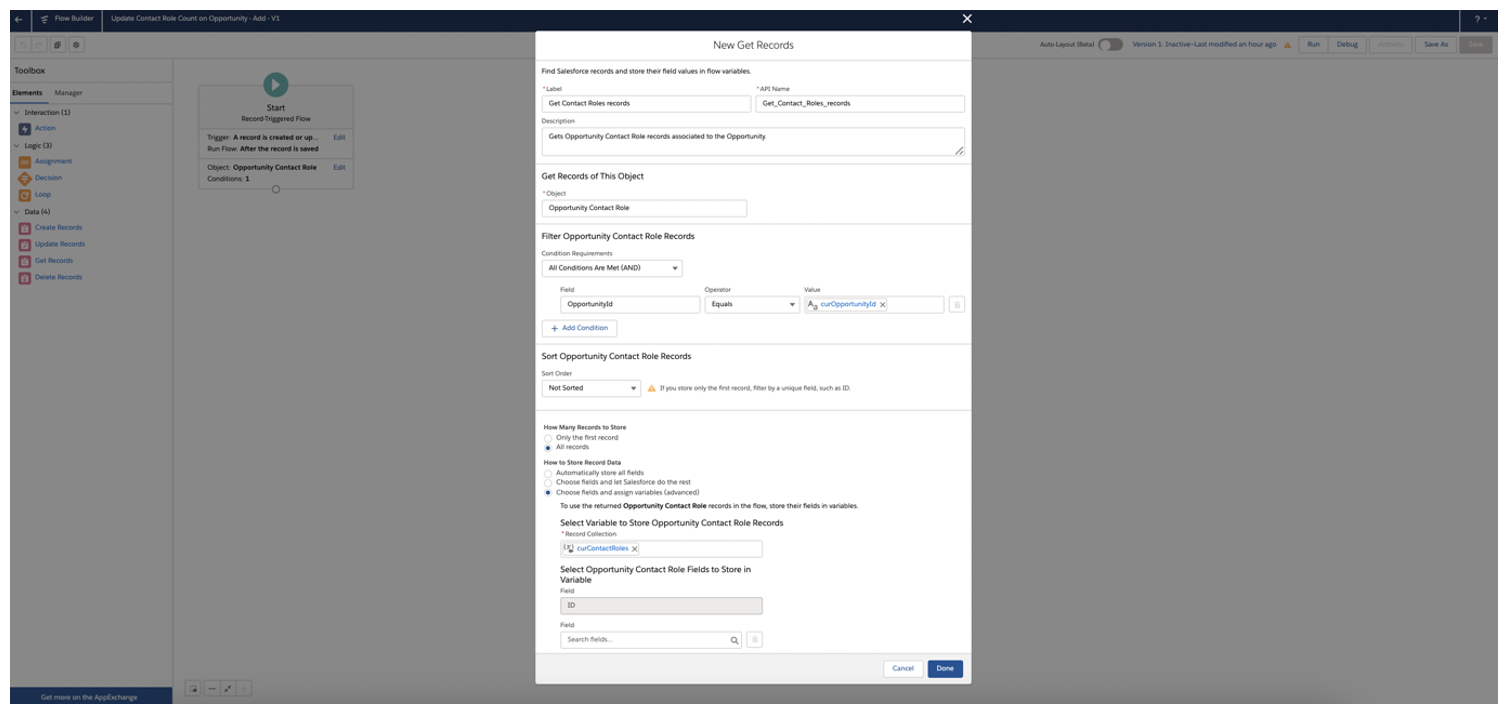
2.4 Drag a ‘Get Records’ Element to the canvas with the following configurations, and then drag a connection from the ‘Start’ Element to the ‘Get Records’ Element:
- Label: Get Contact Role records
- Description: Gets Opportunity Contact Role records associated to the Opportunity
- Object: Opportunity Contact Role
- Condition Requirements: All Conditions Are Met (AND)
- Field: OpportunityId
- Operator: Equals
- Value: curOpportunityId
- Sort Order: Not Sorted
- How Many Records to Store: All records
- How to Store Record Data: Choose fields and assign variables (advanced)
- Record Collection: curContactRoles
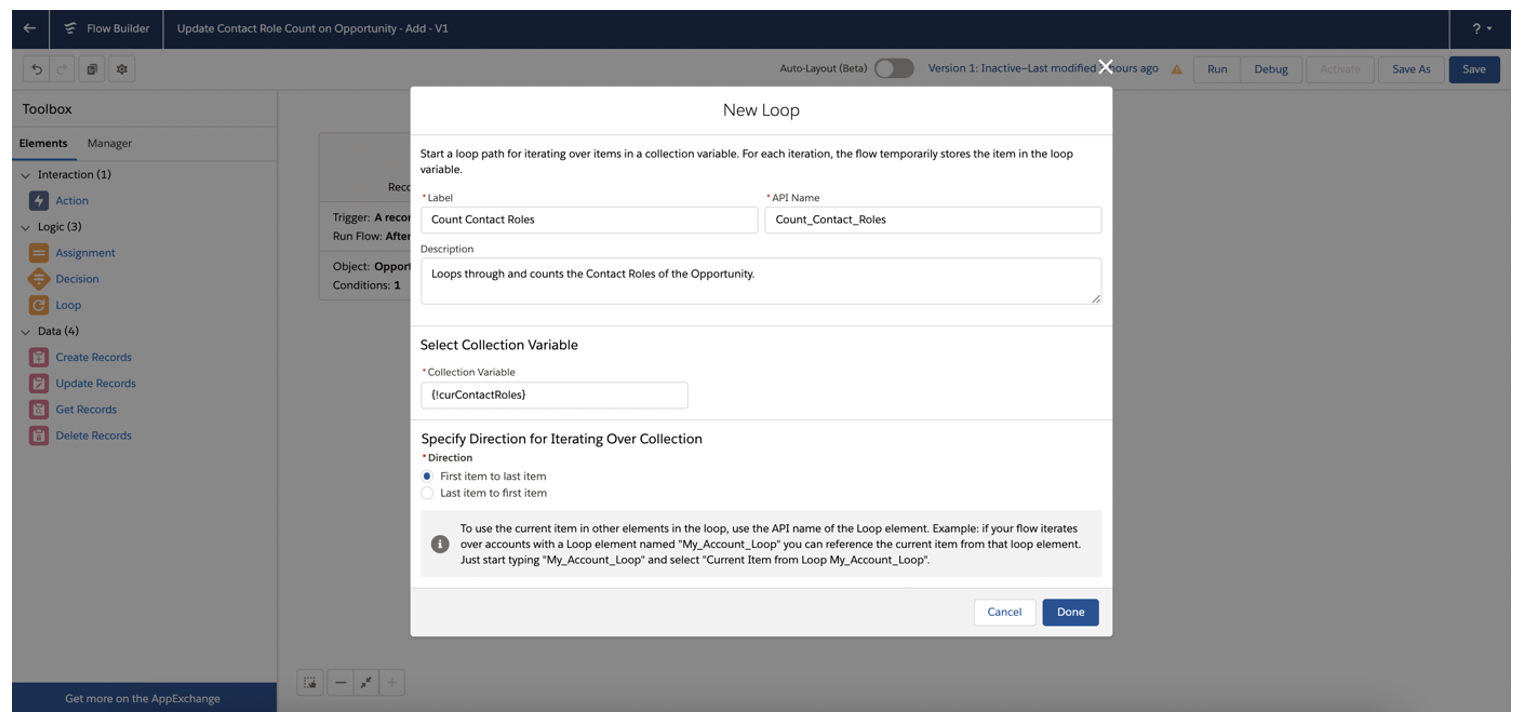
2.5 Drag a ‘Loop’ Element to the canvas with the following configurations, and then drag a connection from the ‘Get Records’ Element to the ‘Loop’ Element:
- Label: Count Contact Roles
- Collection Variable:{!curContactRoles}
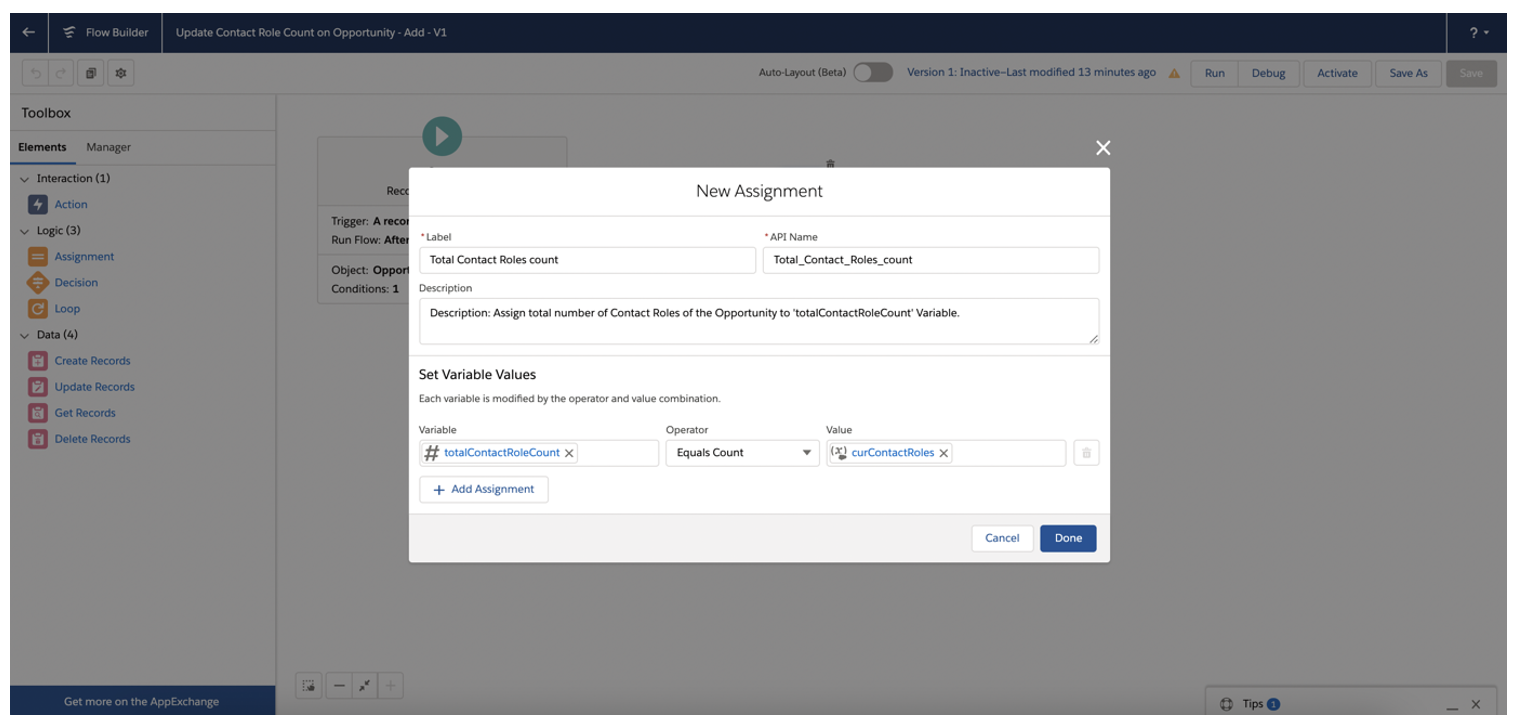
2.6 Drag an ‘Assignment’ Element to the canvas with the following configurations, and then drag a connection from the ‘Loop’ Element to the ‘Assignment’ Element (choose: For each item in the collection) and an additional connection back from the ‘Assignment’ Element to the ‘Loop’ Element to close the loop:
- Label: Total Contact Roles count
- Description: Assign total number of Contact Roles of the Opportunity to 'total Contact Role Count' Variable
- Variable: Total Contact Role Count
- Operator: Equals
- Value: curContactRoles
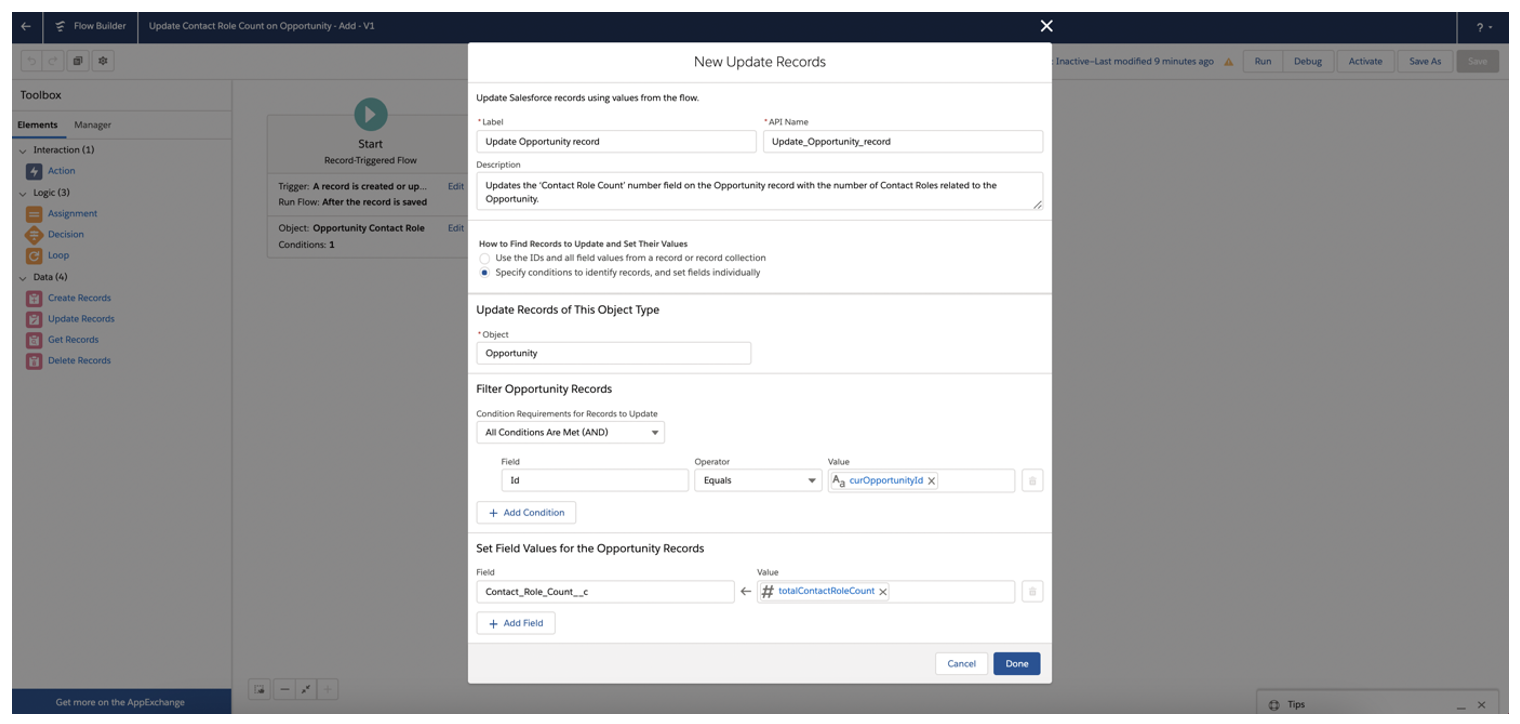
2.7 Drag an ‘Update Records’ Element to the canvas with the following configurations, and then drag a connection from the‘Loop’ Element to the ‘Update Records’ Element:
- Label: Update Opportunity record
- Description: Updates the ‘Contact Role Count’ number field on the Opportunity record with the number of Contact Roles related to the Opportunity
- How to find records to update and set their values: Specify conditions to identify records, and set fields individually
- Object: Opportunity
- Condition Requirements forRecords to Update: All Conditions Are Met (AND)
- Field: Id
- Operator: Equals
- Value: curOpportunityId
- Field: Contact_Role_Count__c
- Value: {!totalContactRoleCount}
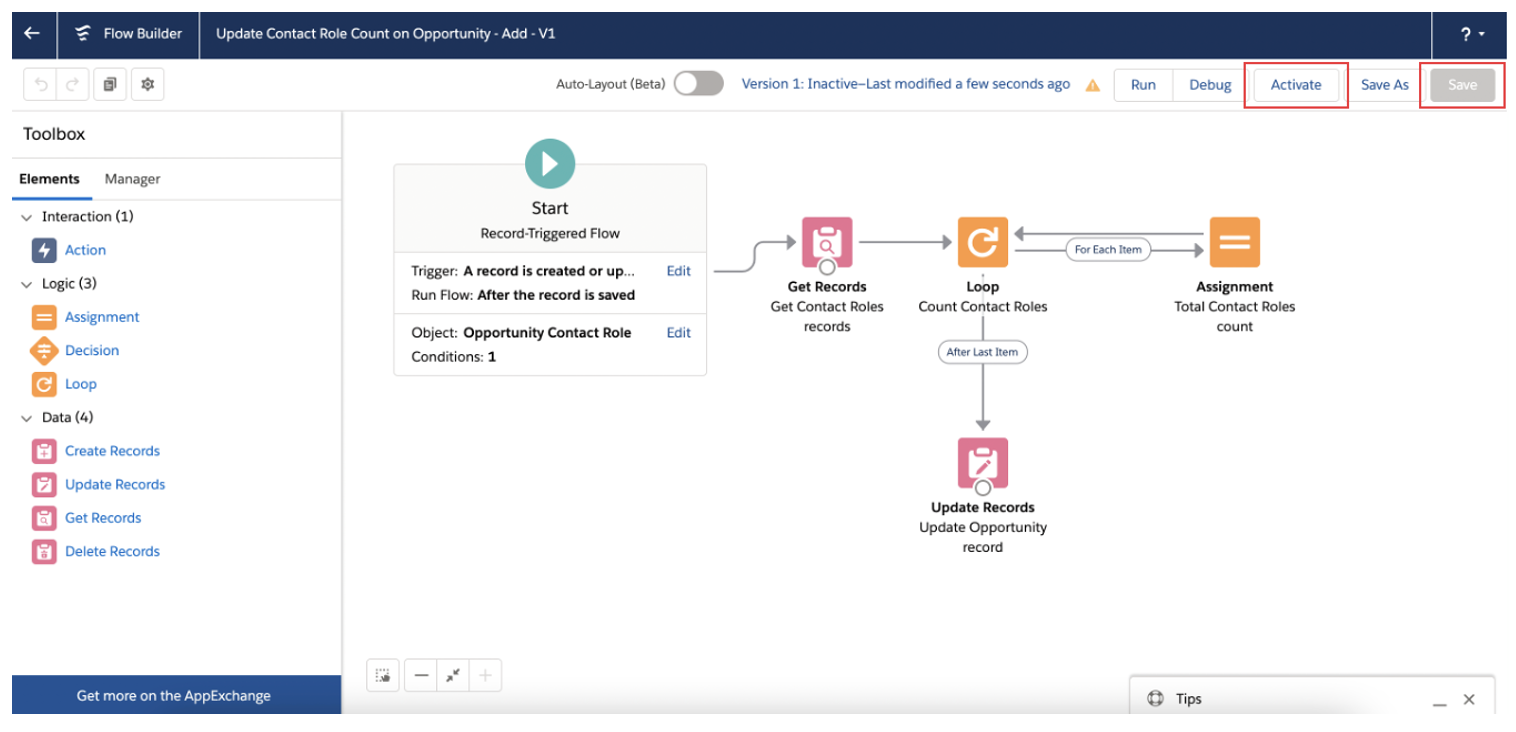
2.8 Save the Flow and name it ‘UpdateContact Role Count on Opportunity and activate the Flow.
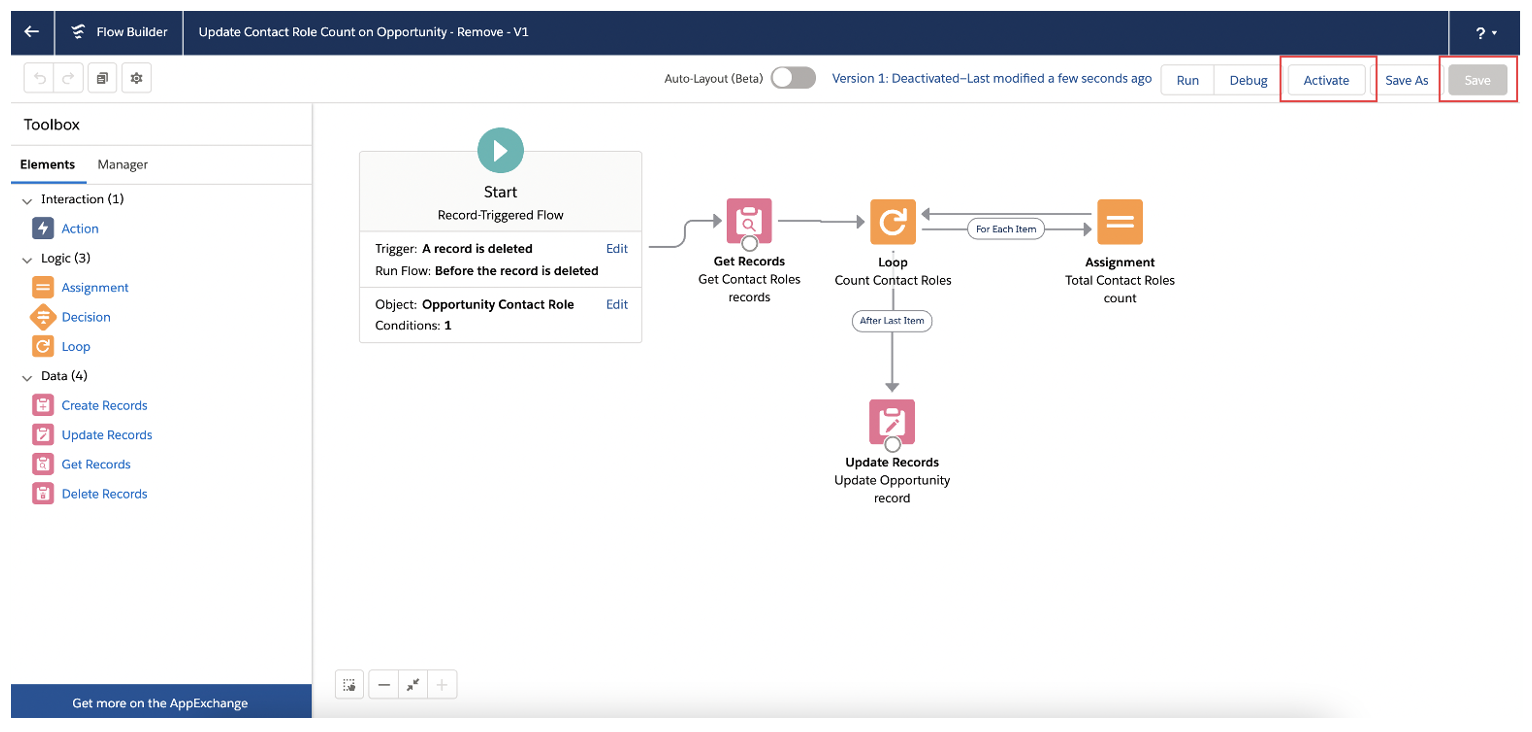
Step 3: Create a Flow that updates the number field when an Opportunity Contact Role is removed from an Opportunity
3.1 Open the ‘Update Contact Role Count on Opportunity, add Flow and click ‘Save As.’
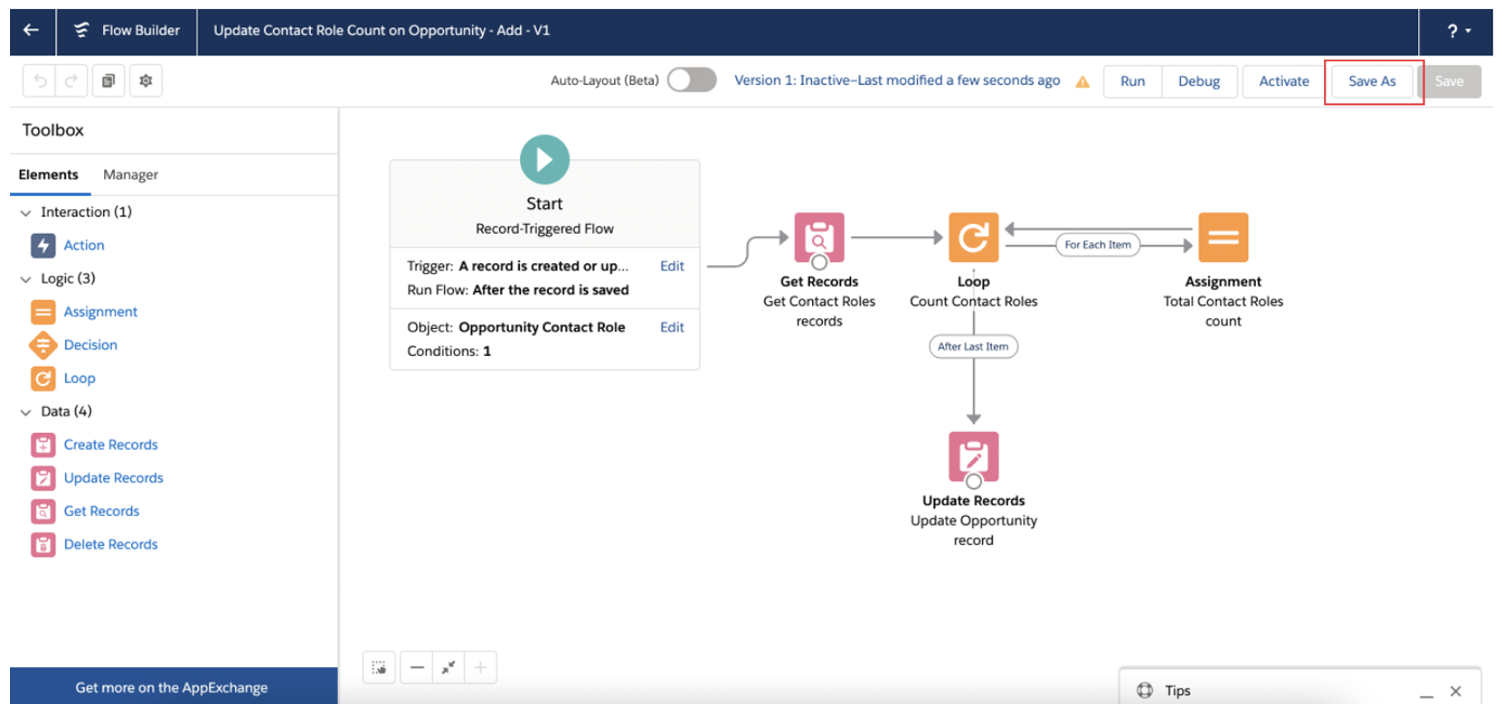
3.2 Choose ‘A New Flow’ and name it, ‘UpdateContact Role Count on Opportunity _Remove’

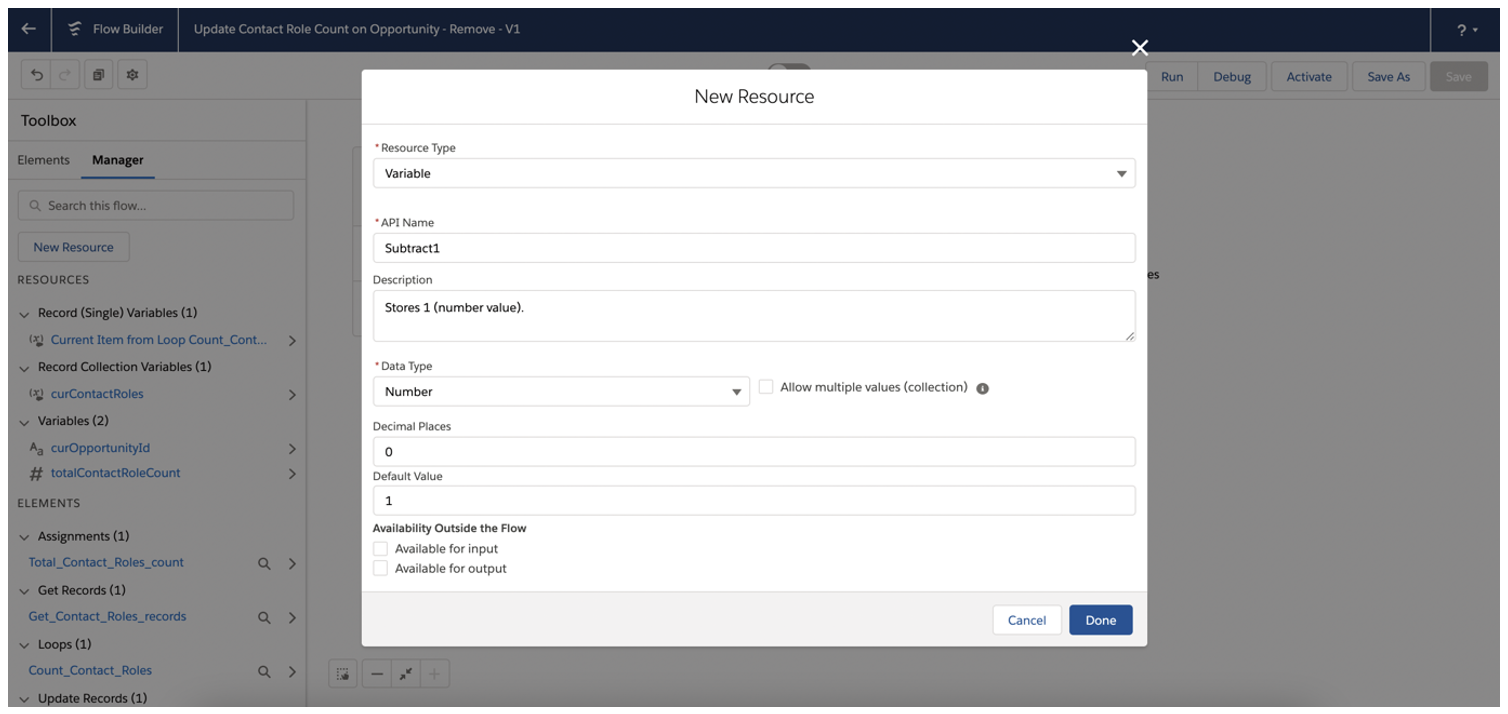
3.3. Create the following Variable by going to the Manager tab and clicking ‘New Resource’:
- Resource Type: Variable
- API Name: Subtract1
- Data Type: Number
- Description: Stores 1 (numbervalue).
- Decimal Places: 0
- Default Value: 1
3.4. Open the ‘Start’ Element and change the condition for triggering the Flow to: A record is deleted.

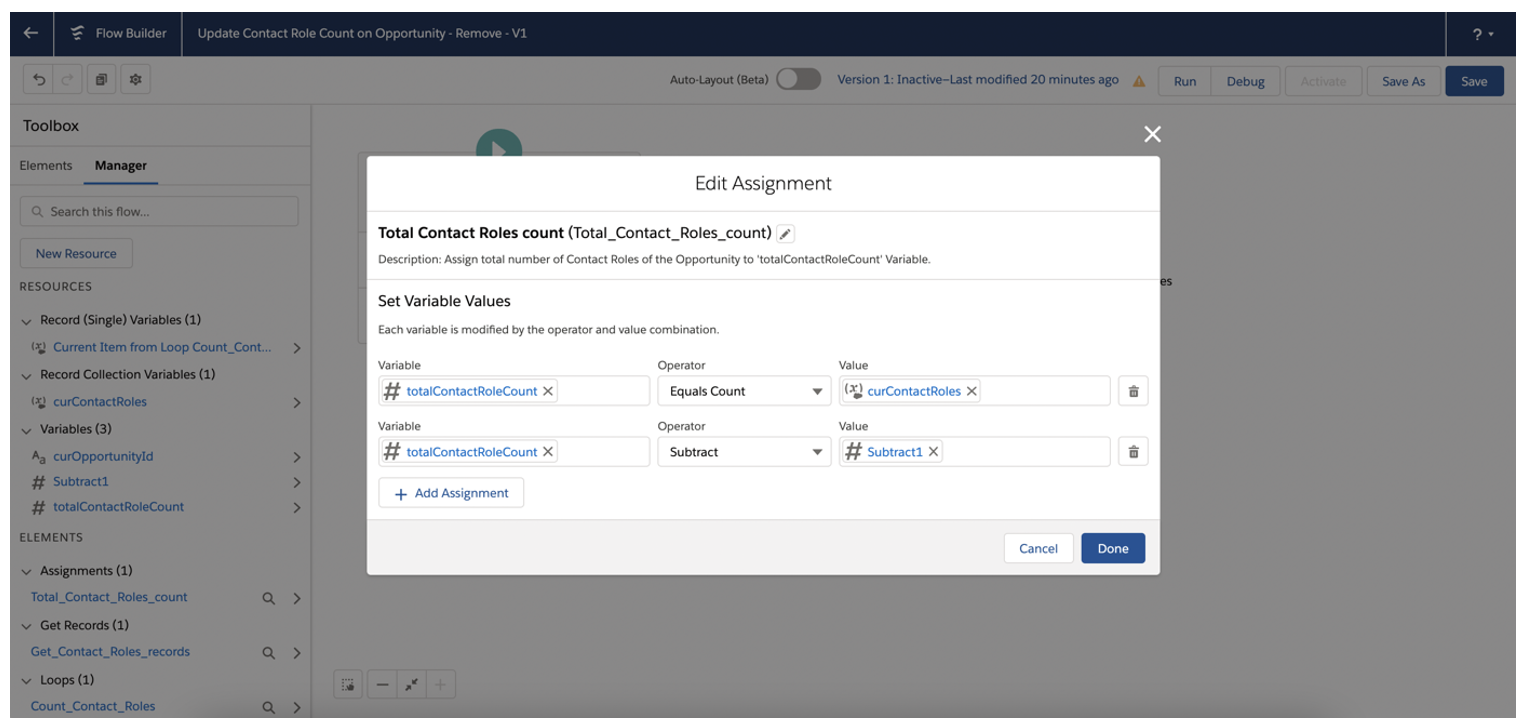
3.5. Open the Assignment Element and add an additional assignment with the following criteria:
- Variable:{!totalContactRoleCount}
- Operator: Subtract
- Value: {!Subtract1}
This assignment is important to add since the Flow is run before the deletion is completed.
Without this assignment, the Contact Role Count will be set to the number of Contact Roles associated with the Opportunity prior to the completion of the actual deletion - which we don’t want since that would be inaccurate.
3.6. Save and activate the Flow
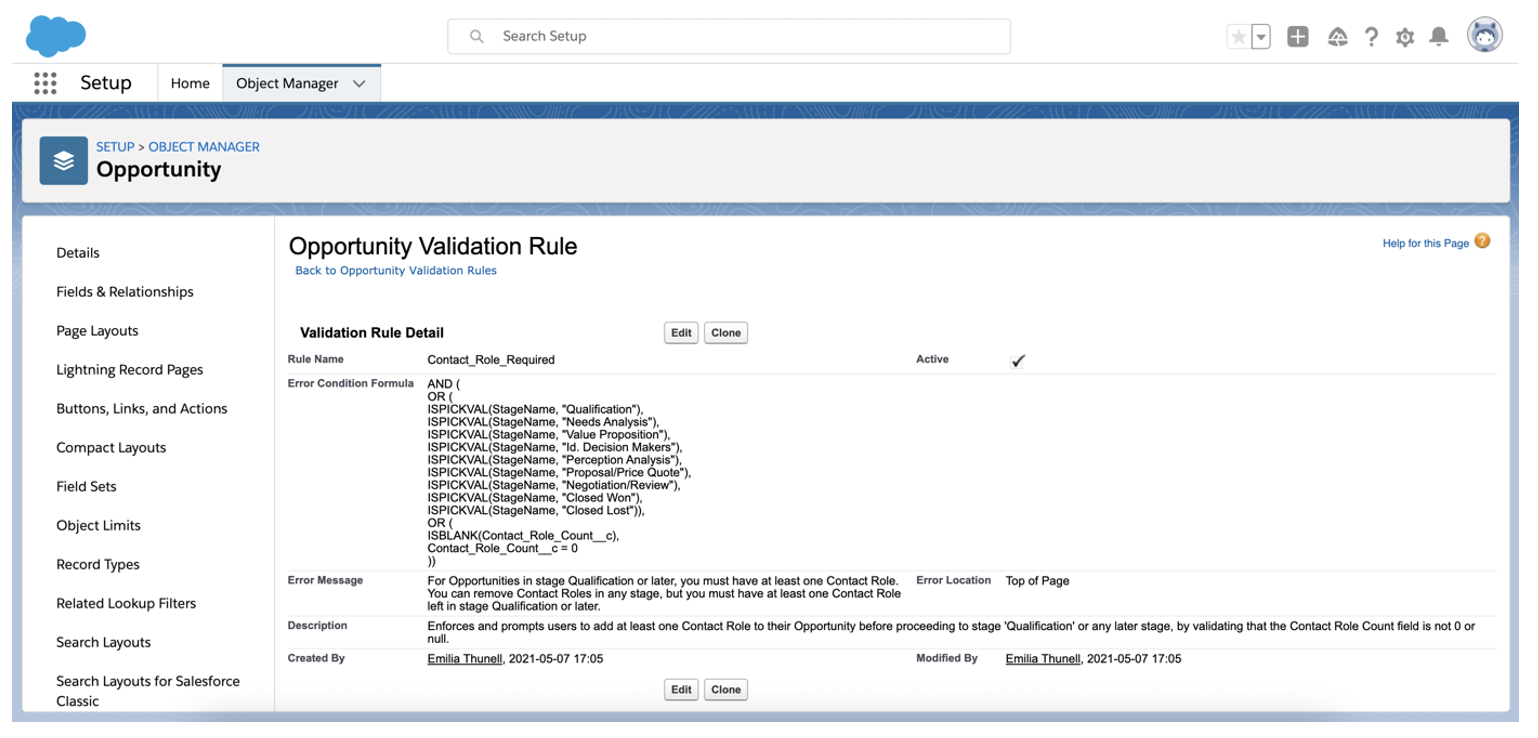
Step 4: Create a Validation Rule that ensures an Opportunity has at least one associated Opportunity Contact Role in the Qualification stage, or any later stage
4.1. Create a new Validation Rule for the Opportunity Object:
- Rule Name:Contact_Role_Required
- Active: Check the checkbox
- Description: Enforces and prompts users to add at least one Contact Role to their Opportunity before proceeding to Qualification stage or any later stage by validating that theContact Role Count field is not 0 or null.
- Error Condition Formula:
AND (
OR (
ISPICKVAL(StageName,"Qualification"),
ISPICKVAL(StageName,"Needs Analysis"),
ISPICKVAL(StageName,"Value Proposition"),
ISPICKVAL(StageName,"Id. Decision Makers"),
ISPICKVAL(StageName,"Perception Analysis"),
ISPICKVAL(StageName,"Proposal/Price Quote"),
ISPICKVAL(StageName,"Negotiation/Review"),
ISPICKVAL(StageName,"Closed Won"),
ISPICKVAL(StageName,"Closed Lost")),
OR (
ISBLANK(Contact_Role_Count__c),
Contact_Role_Count__c= 0
))
- Error Message: For Opportunities in the Qualification stage or later, you must have at least one Contact Role. You can remove Contact Roles in any stage, but you must have at least one Contact Role left in the Qualification stage, or later.
Note that the error condition formula needs to be adjusted depending on the stage names in your organization, and from the stages Contact Roles should be mandatory. The stage names in this guide are Salesforce’s out-of-the-box stage names.
Considerations
Communicate changes to your users prior to go-live
As with any change that has an impact on users, make sure to communicate to your sales users and marketers these changes and what those changes mean prior to go-live.
Apart from training sessions, a good best practice is to utilize release notes and Salesforce prompts to inform users about any upcoming changes. Set aside some extra time for support during the first days of the go-live, and pay attention to potential Flow Application Errors in your email inbox, to quickly capture problems that users might run into.
Be aware of unclear error messages when trying to remove all Contact Roles in the Qualification stage, or later
If a user tries to remove a Contact Role in the Qualification stage, or later, and that is the only Contact Role associated with the Opportunity, a Flow Application Error will appear. This error message is not very user friendly, but due to Salesforce limitations, it cannot be customized. Make sure to communicate this to your users prior to go-live to avoid confusion.
Handling Opportunities without any Contact Role(s) in the Qualification stage, or later
Preferably, all Opportunities should have been associated with at least one Contact Role prior to the go-live of the solution if they are in the Qualification stage, or later.
This is something to communicate to your sales users who manage Opportunities.
If the solution is rolled out when Opportunities without associated Contact Roles in the Qualification stage or later exist, users will not be able to move their Opportunities to a later stage. They will also not be able to add a Contact Role to their Opportunity in the Qualification stage, or at any later stage.
To work around this issue, users need to move their Opportunity to a stage earlier than Qualification, add a Contact Role and then move it back to a later stage. Again, make sure to communicate this to your users prior to go-live to avoid confusion.
Interested in learning more about how you can leverage the right data to prove the value of your marketing efforts, or are looking to optimize your Return on Marketing Investment reporting with Salesforce? We’ve help many of our B2B clients create a solution built around their business goals. Book a one-on-one meeting with one of our Certified Salesforce Consultants: