Communicating with customers throughout their purchasing journey is essential for building strong, long-lasting relationships. However, it's not just about the initial sale; following up after purchase can be just as important. Effective follow-up communication can help you build stronger customer relationships and increase repeat business. By keeping the lines of communication open and showing that you care about their experience, you can foster customer loyalty and turn satisfied customers into brand advocates. It can also provide valuable feedback that you can use to improve your products/services and refine your overall customer experience.
Manually reaching out to every customer at different stages of their journey can be a time-consuming task and can often be forgotten. If you already use Salesforce CRM, we will describe in this article how to use scheduled paths in Salesforce record-triggered flow to automate communications.
Article contents:
Part 1: Business use case using Scheduled Path
Part 2: Build a solution step-by-step using Salesforce Flow
Part 1: Setting up a Scheduled Path in Flow
What is Salesforce Scheduled Path?
Salesforce scheduled path allows you to take action based on an already record-triggered flow. It is an alternative for the ‘Pause’ feature in screen flows and allows businesses to streamline their workflow and improve efficiency by automating repetitive tasks, reducing the scope for human error, and freeing up resources for more critical tasks.
Business Use Case
In this scenario, there is a business need to automatically send a follow up email to the customer 2 days after an opportunity is closed, and a customer survey 30 days after.
User Stories were created for this scenario to define the feature and goal for the end-user:
User Story 1: “As a Sales Manager, I want to follow up with my customers directly after a deal is closed, and send a customer survey 30 days after purchase to ensure the client is satisfied, and is likely to return in the future.”
User Story 2: “As a Marketing Manager, I want to gather feedback from customers after purchase so I can improve the post-purchase experience.”
A user story is an explanation of a software feature written from the perspective of the end user or customer. They typically follow this simple structure: As a < type of user >, I want < some goal > so that < some reason >.
Business value of the automated solution
1. Save time and create more efficiency: Sales and marketing teams spend a significant amount of time following up with customers. With an automated solution, the amount of manual work they have to do can be reduced significantly. This means that these teams can focus on other important tasks, such as lead generation and nurturing.
2. Better customer relationships: Instead of relying on team members to manually follow up, with this automation in place, you can be sure that your customers will always receive timely and relevant communications throughout the customer journey.
Business scenario: What the process looks like before automation is implemented
Ted is a salesperson at XYZ Company. Management and marketing need the information from the customer survey to continually improve the customer experience, which is why sending relevant and timely emails are essential to receiving feedback and staying top of mind with the client. Therefore, Ted has been told to complete 2 tasks after an opportunity is closed:
1. Send a follow up email 2 days after the opportunity is closed;
2. Send an email with a customer survey link 30 days after the opportunity is closed.
Currently, Ted has to manually create 2 tasks whenever an opportunity is closed, to get a reminder to draft and send the 2 emails days after an opportunity is closed in Salesforce. Ted can close several deals within the month, and remembering to send out these emails has become tedious, sometimes forgotten during the busy seasons.
By using this solution, instead of having salespeople remember to reach out after a deal is closed, you can automate after-purchase communications with your customers, and indeed any other types of communications throughout the sales process, freeing up time to focus on other critical tasks.
Part 2: Build a step-by-step solution in Salesforce Flow Builder
Outlined requirements and technical solution overview
In this post, we will describe how to automatically send out a personalised follow-up email to a related contact on an opportunity 2 days after the opportunity closes, and a customer survey email to the same contact 30 days after the opportunity closes.

Summary of the technical solution
Create a record-triggered flow that is triggered when opportunity is closed and set up scheduled paths with email actions to send out the required emails 2 days and 30 days after opportunity close date.
Prerequisites
Opportunity contact role is added to the opportunity.
Note: In Salesforce, there is no direct relationship between Contacts and Opportunities. Opportunities have a relationship with Accounts, and Accounts have a relationship with Contacts. The standard Object ‘Opportunity Contact Role’ creates a link between Contacts and Opportunities.

Configuring the technical solution
What the completed flow will look like:

Step 1: Create a record-triggered flow to update the close date to the date when opportunities are closed
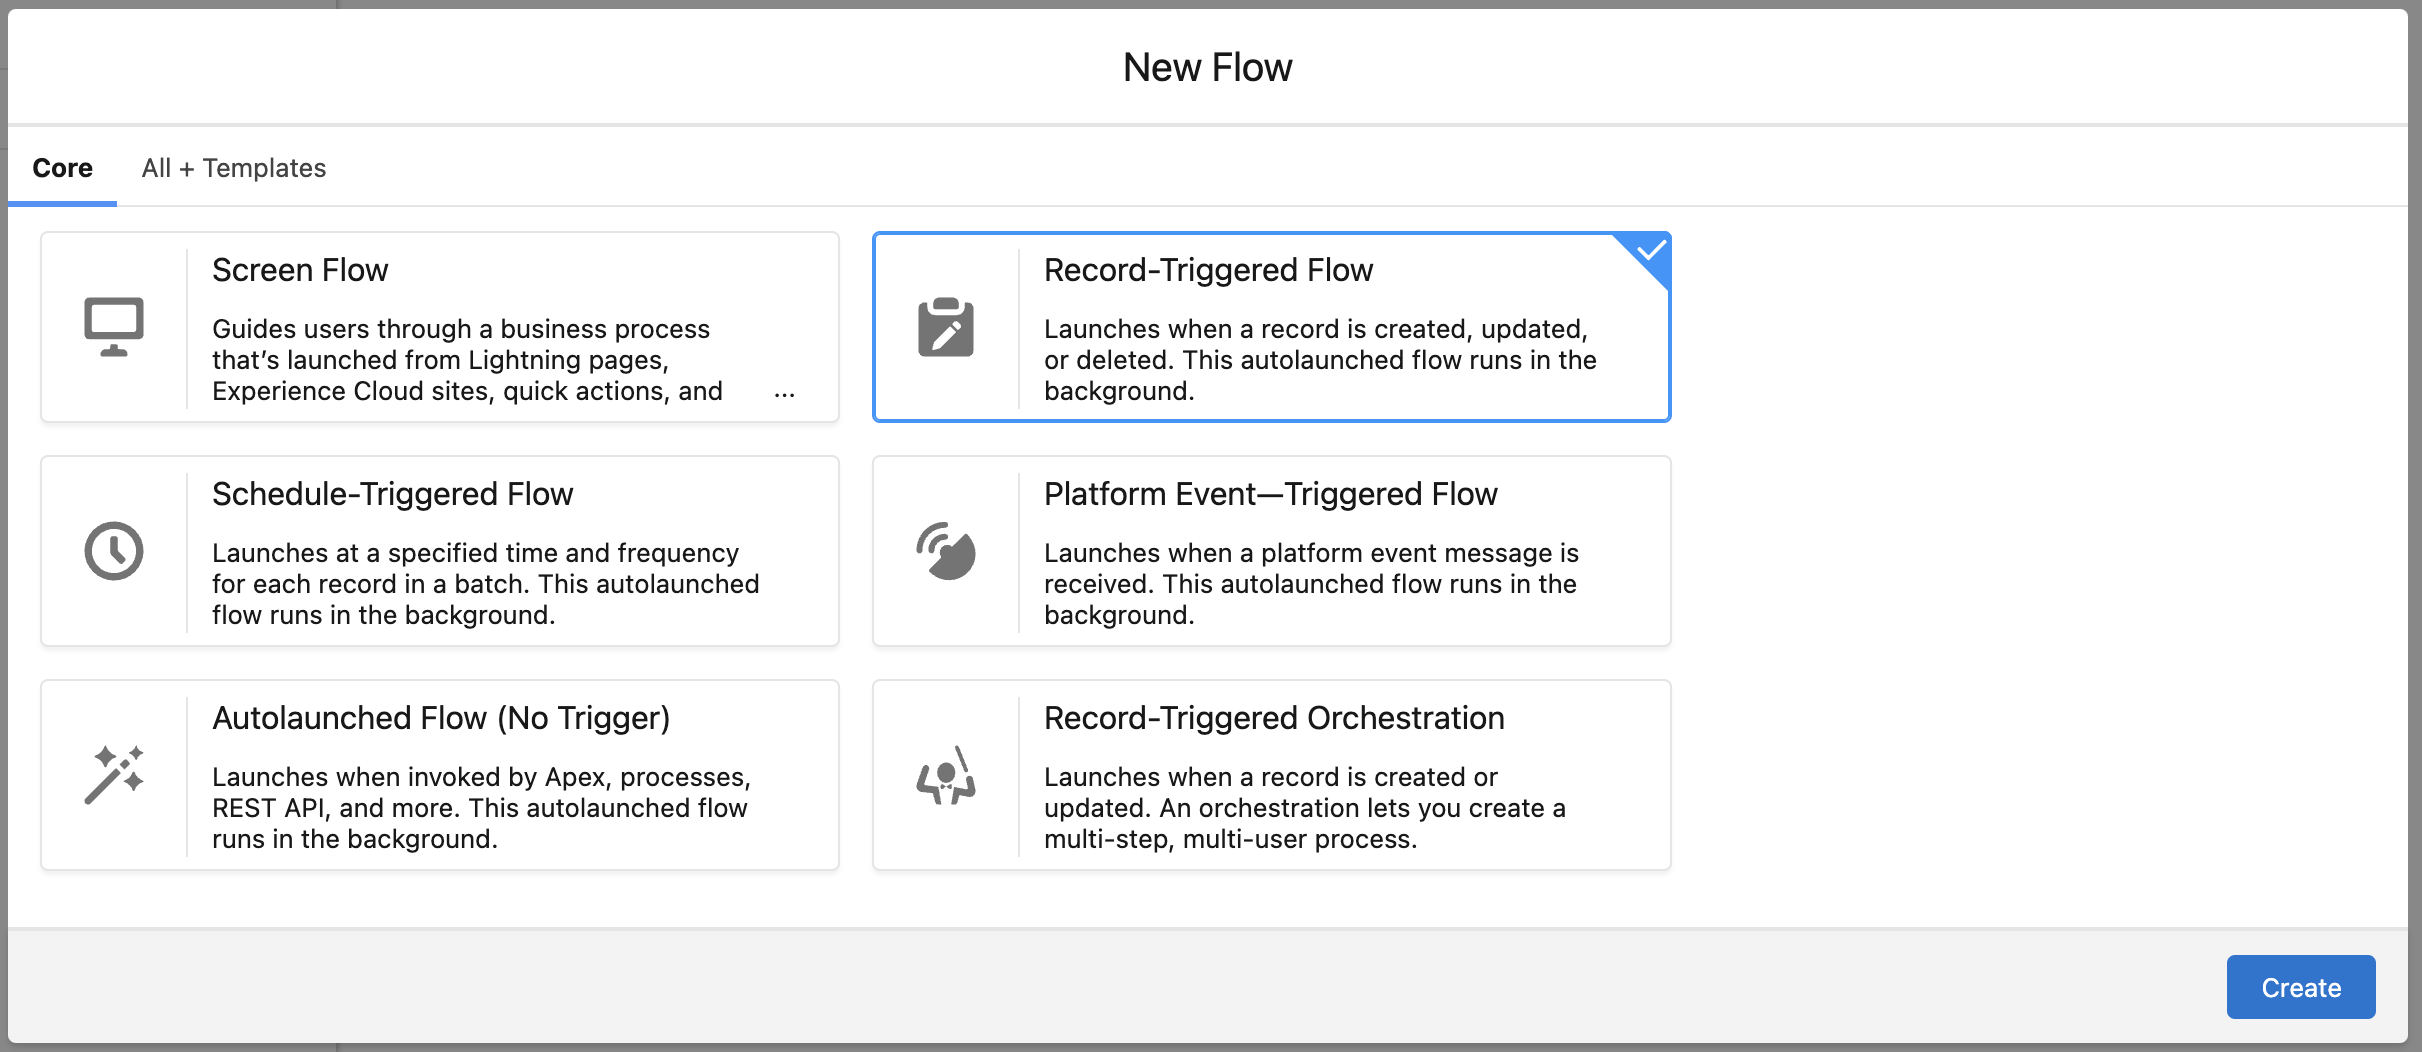
1.1 Create a record triggered flow:
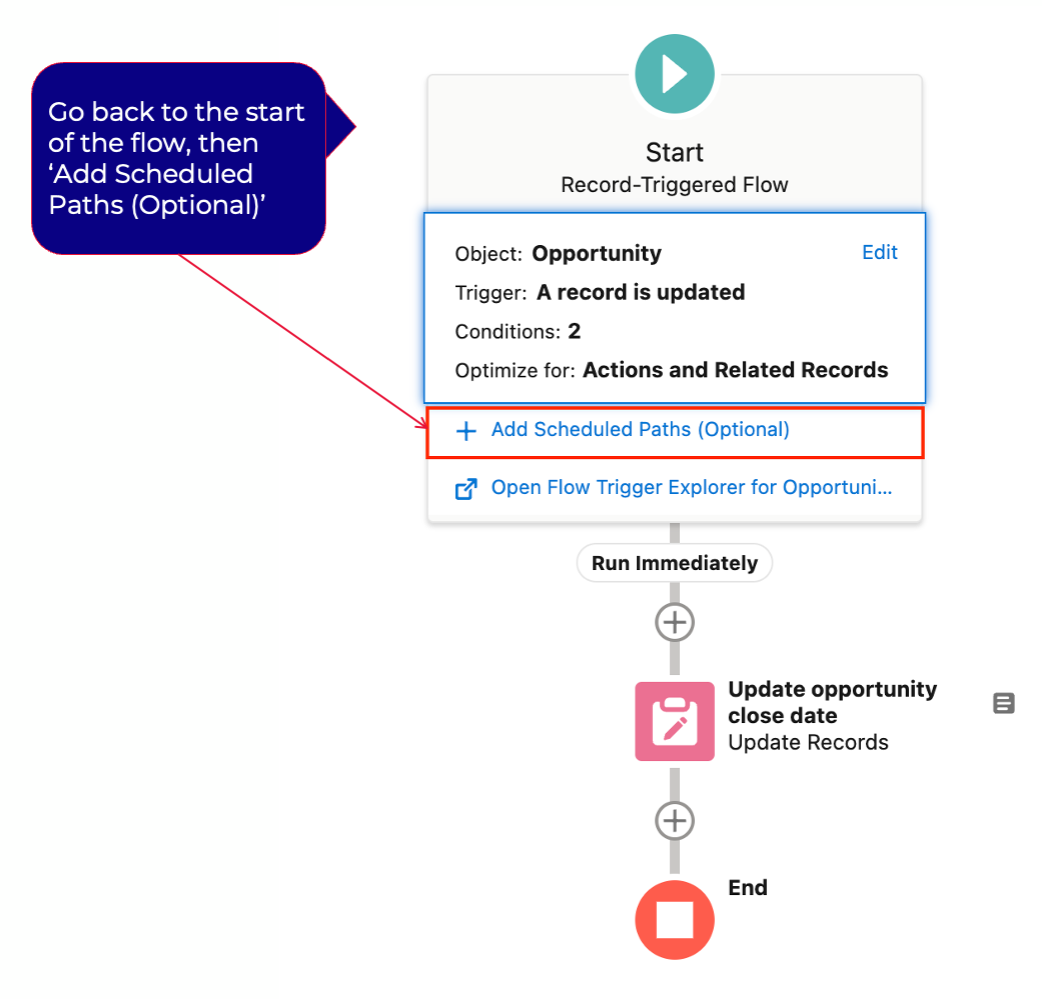
1.2 Configure the trigger and choose the Object in the ’Start’ Element:
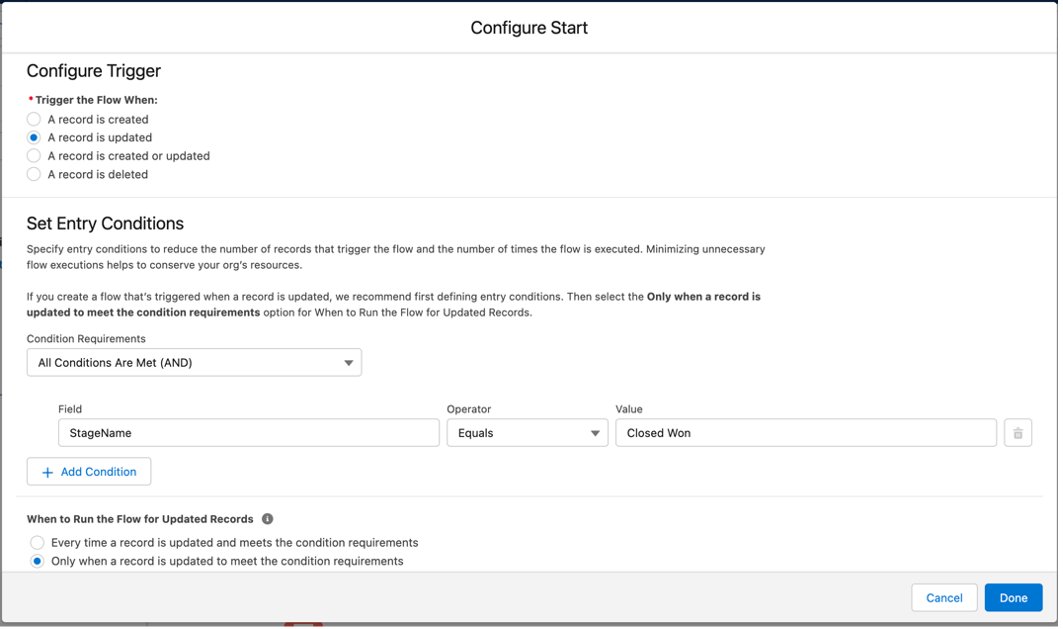
• Object: Opportunity
• Trigger the Flow When: A record is updated
• Condition Requirements: StageName = Closed Won
• When to Run the Flow for Updated Records: Only when a record is updated to meet the condition requirements
• Optimize the Flow for: Actions and Related Records
1.3 Create the following resources by going to the Manager tab and clicking ‘New Resource’:
- A variable that will store information about the Contact:
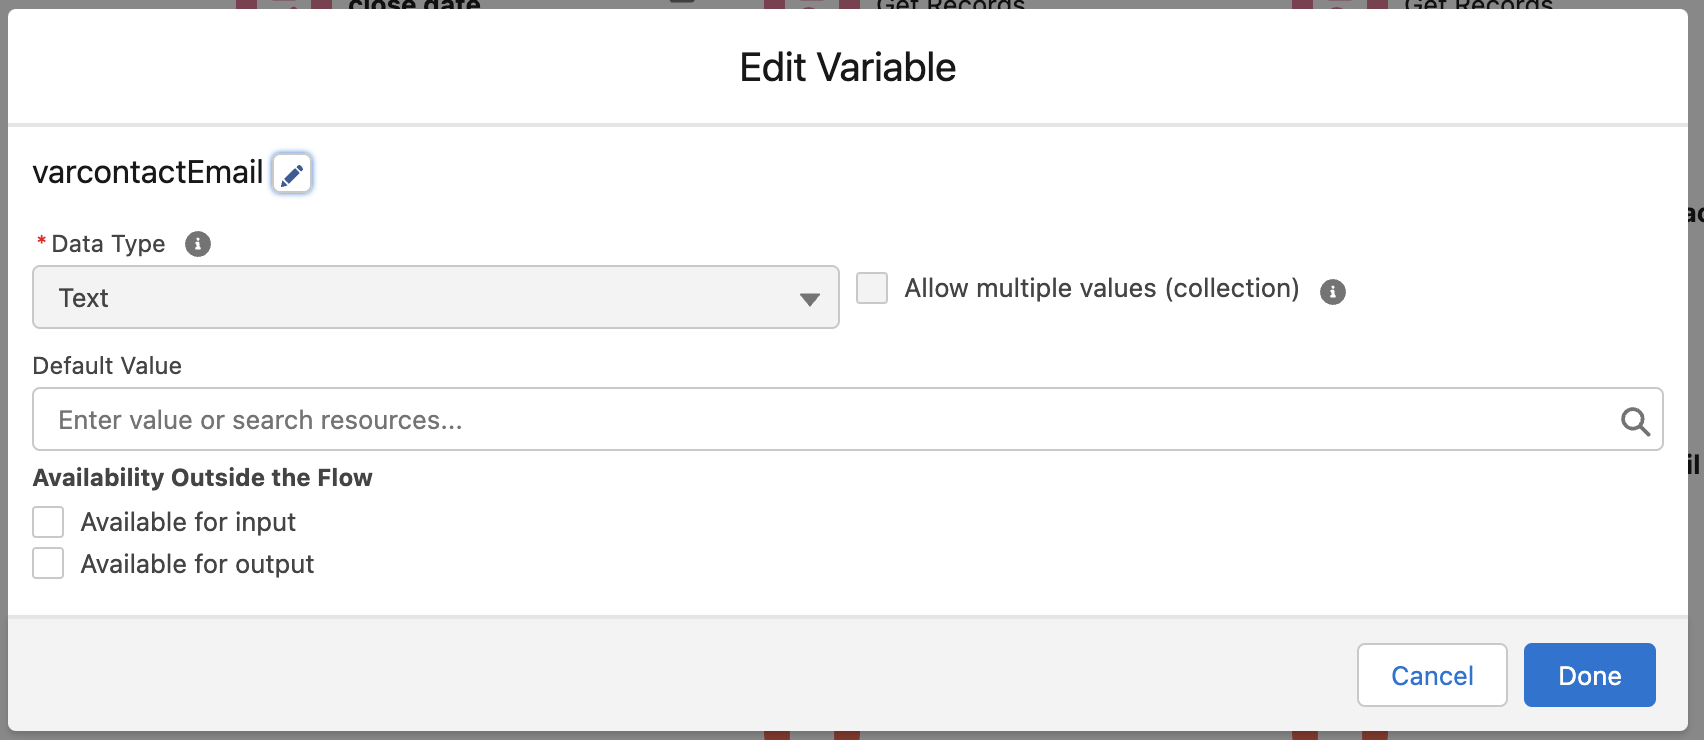
- Resource Type: Variable
- API Name: varcontactEmail
- Data Type: Text
- A text template for the body of the email to be sent out 2 days after opportunity close date:
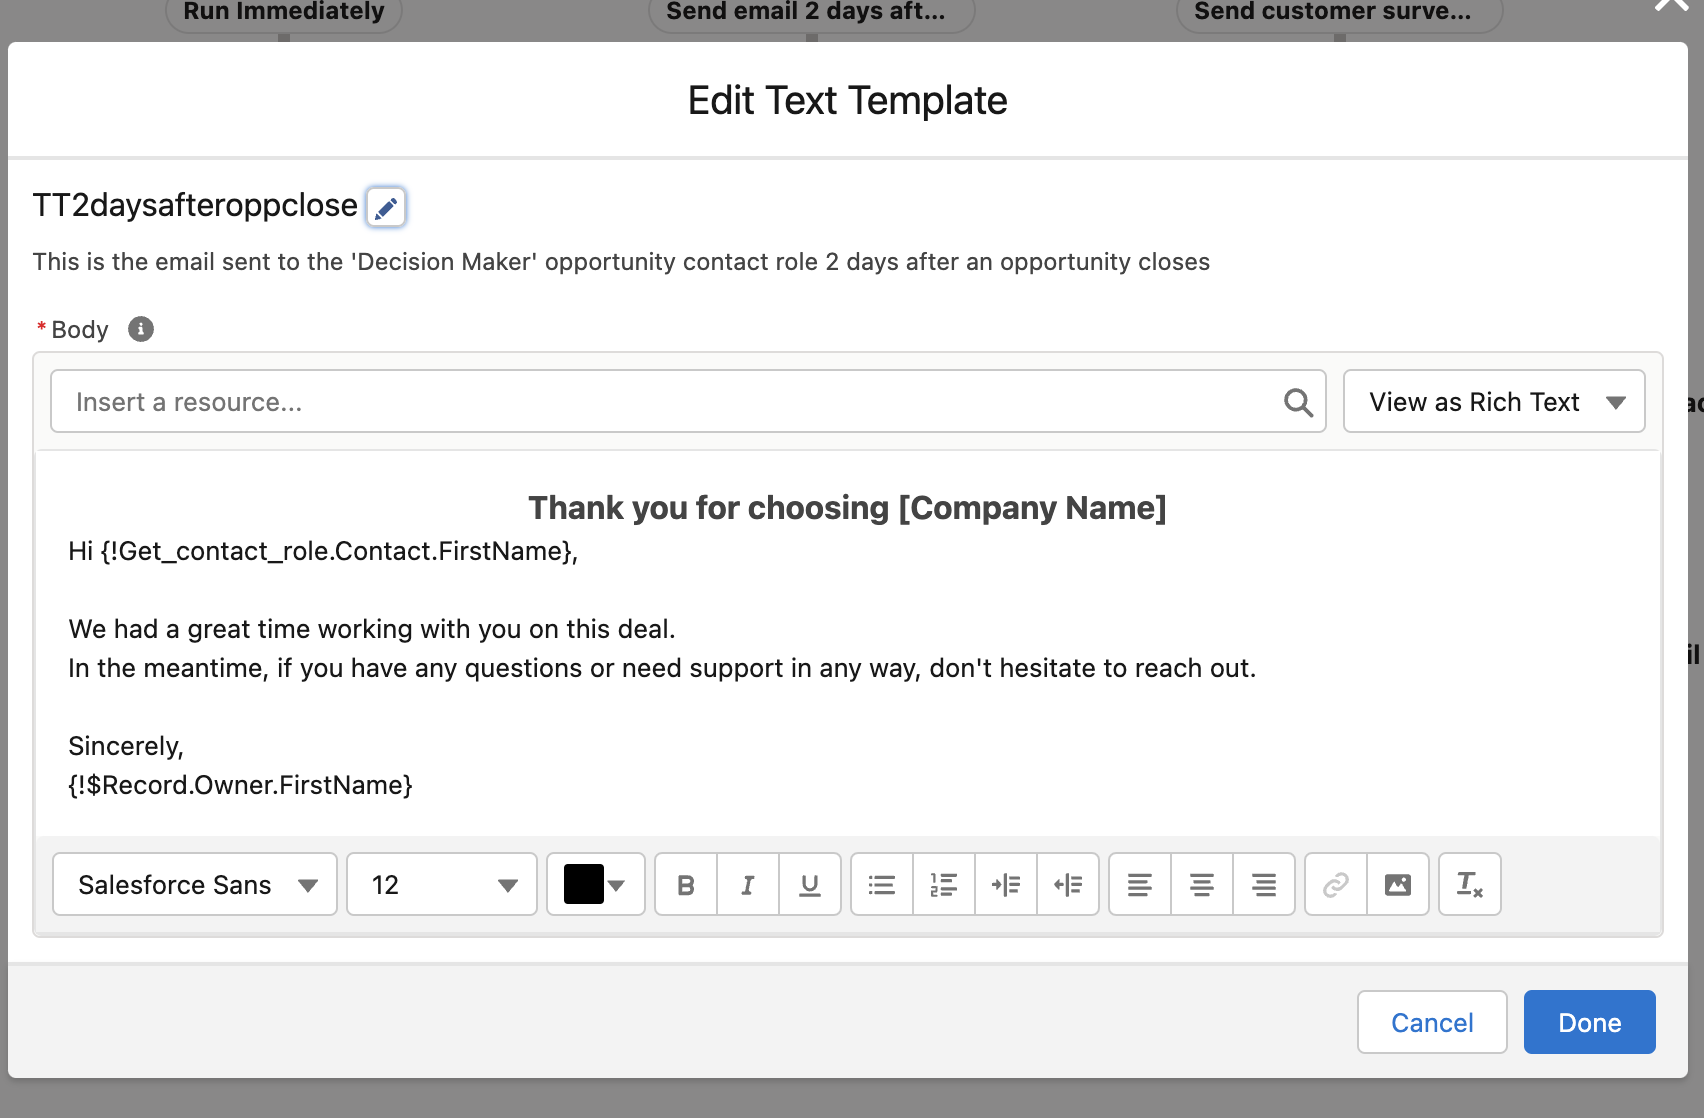
• Resource Type: Text Template
• API Name: 2daysafteroppclose
• Description: This is the email sent to the ‘Decision Maker’ opportunity contact role 2 days after opportunity closes
• Body: Enter the email body (enter the text & personalise the email using ‘Insert a resource’ to use values within the flow). In this example, we have added the Contact’s first name and the Opportunity owner’s first name.
- A text template for the body of the email to be sent out 30 days after opportunity close date:
• Resource Type: Text Template
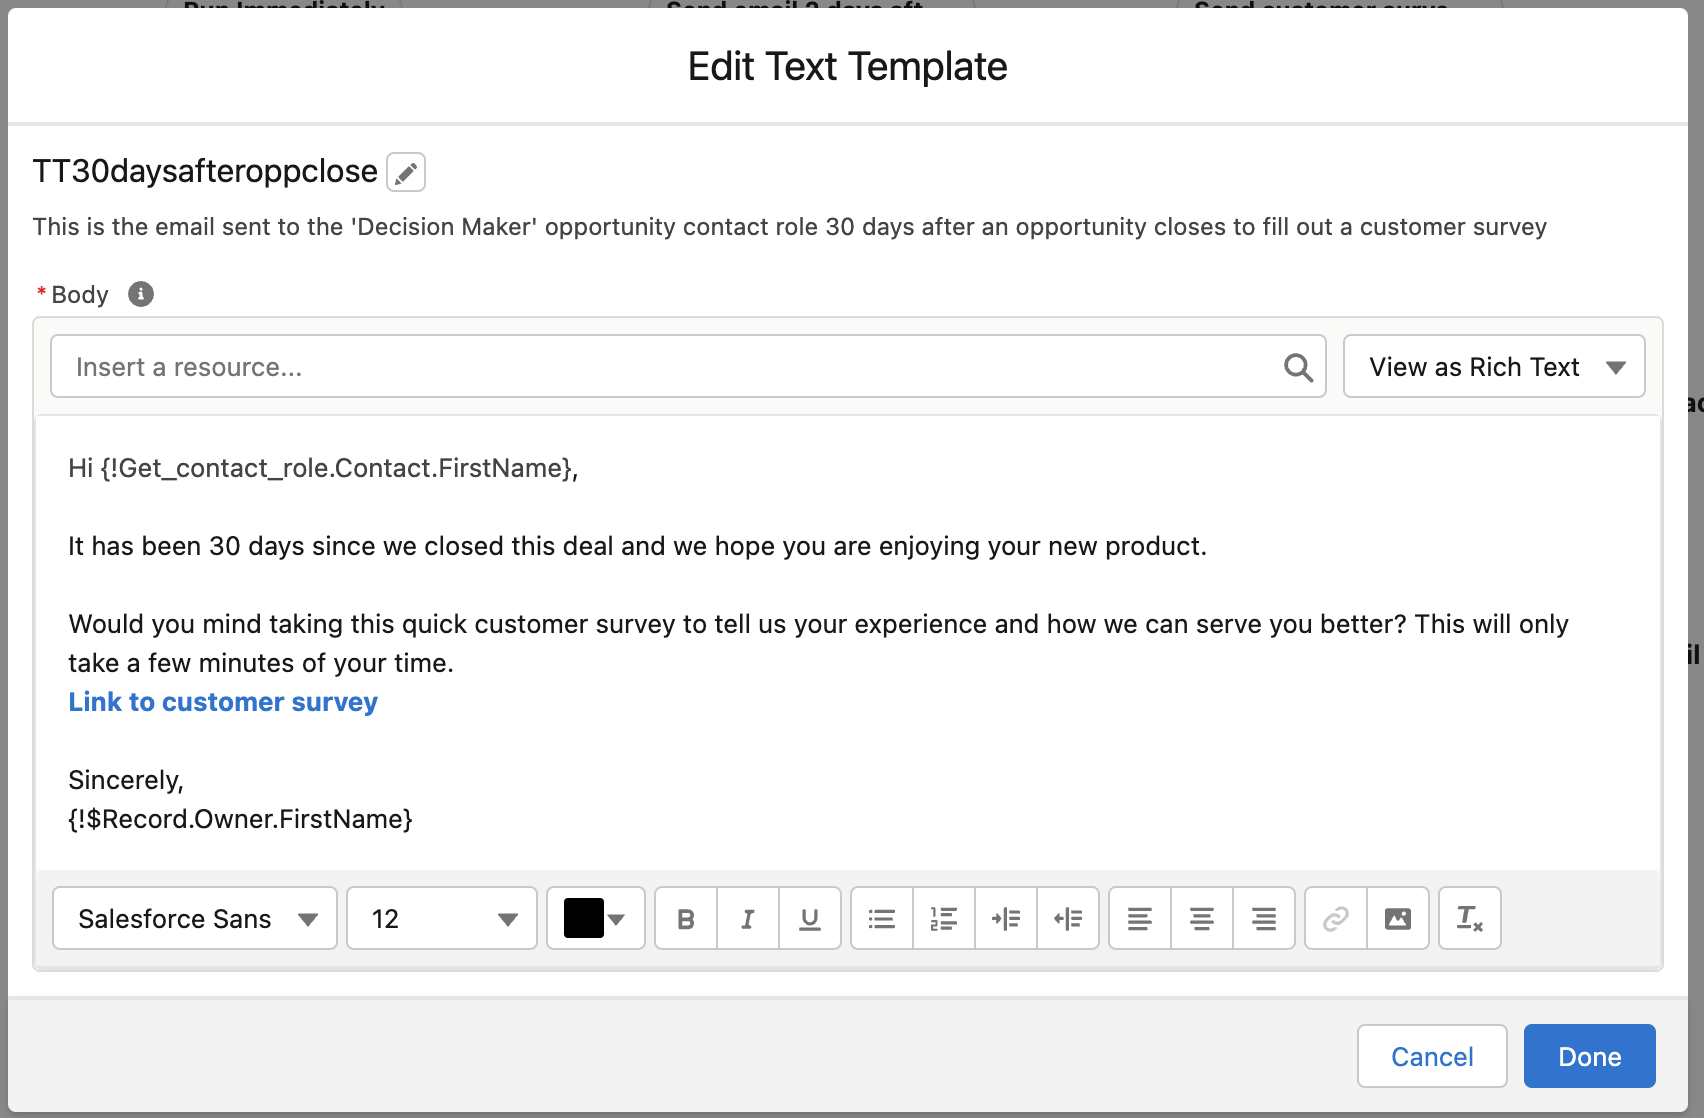
• API Name: 30daysafteroppclose
• Description: This is the email sent to the ‘Decision Maker’ opportunity contact role 30 days after opportunity closes to fill out customer survey
• Body: Enter the email body (enter the text & personalise the email using ‘Insert a resource’ to use values within the flow). In this example, we have added the Contact’s first name and the Opportunity owner’s first name.
1.4 Add an update element with the following configuration to update the Opportunity Close date:
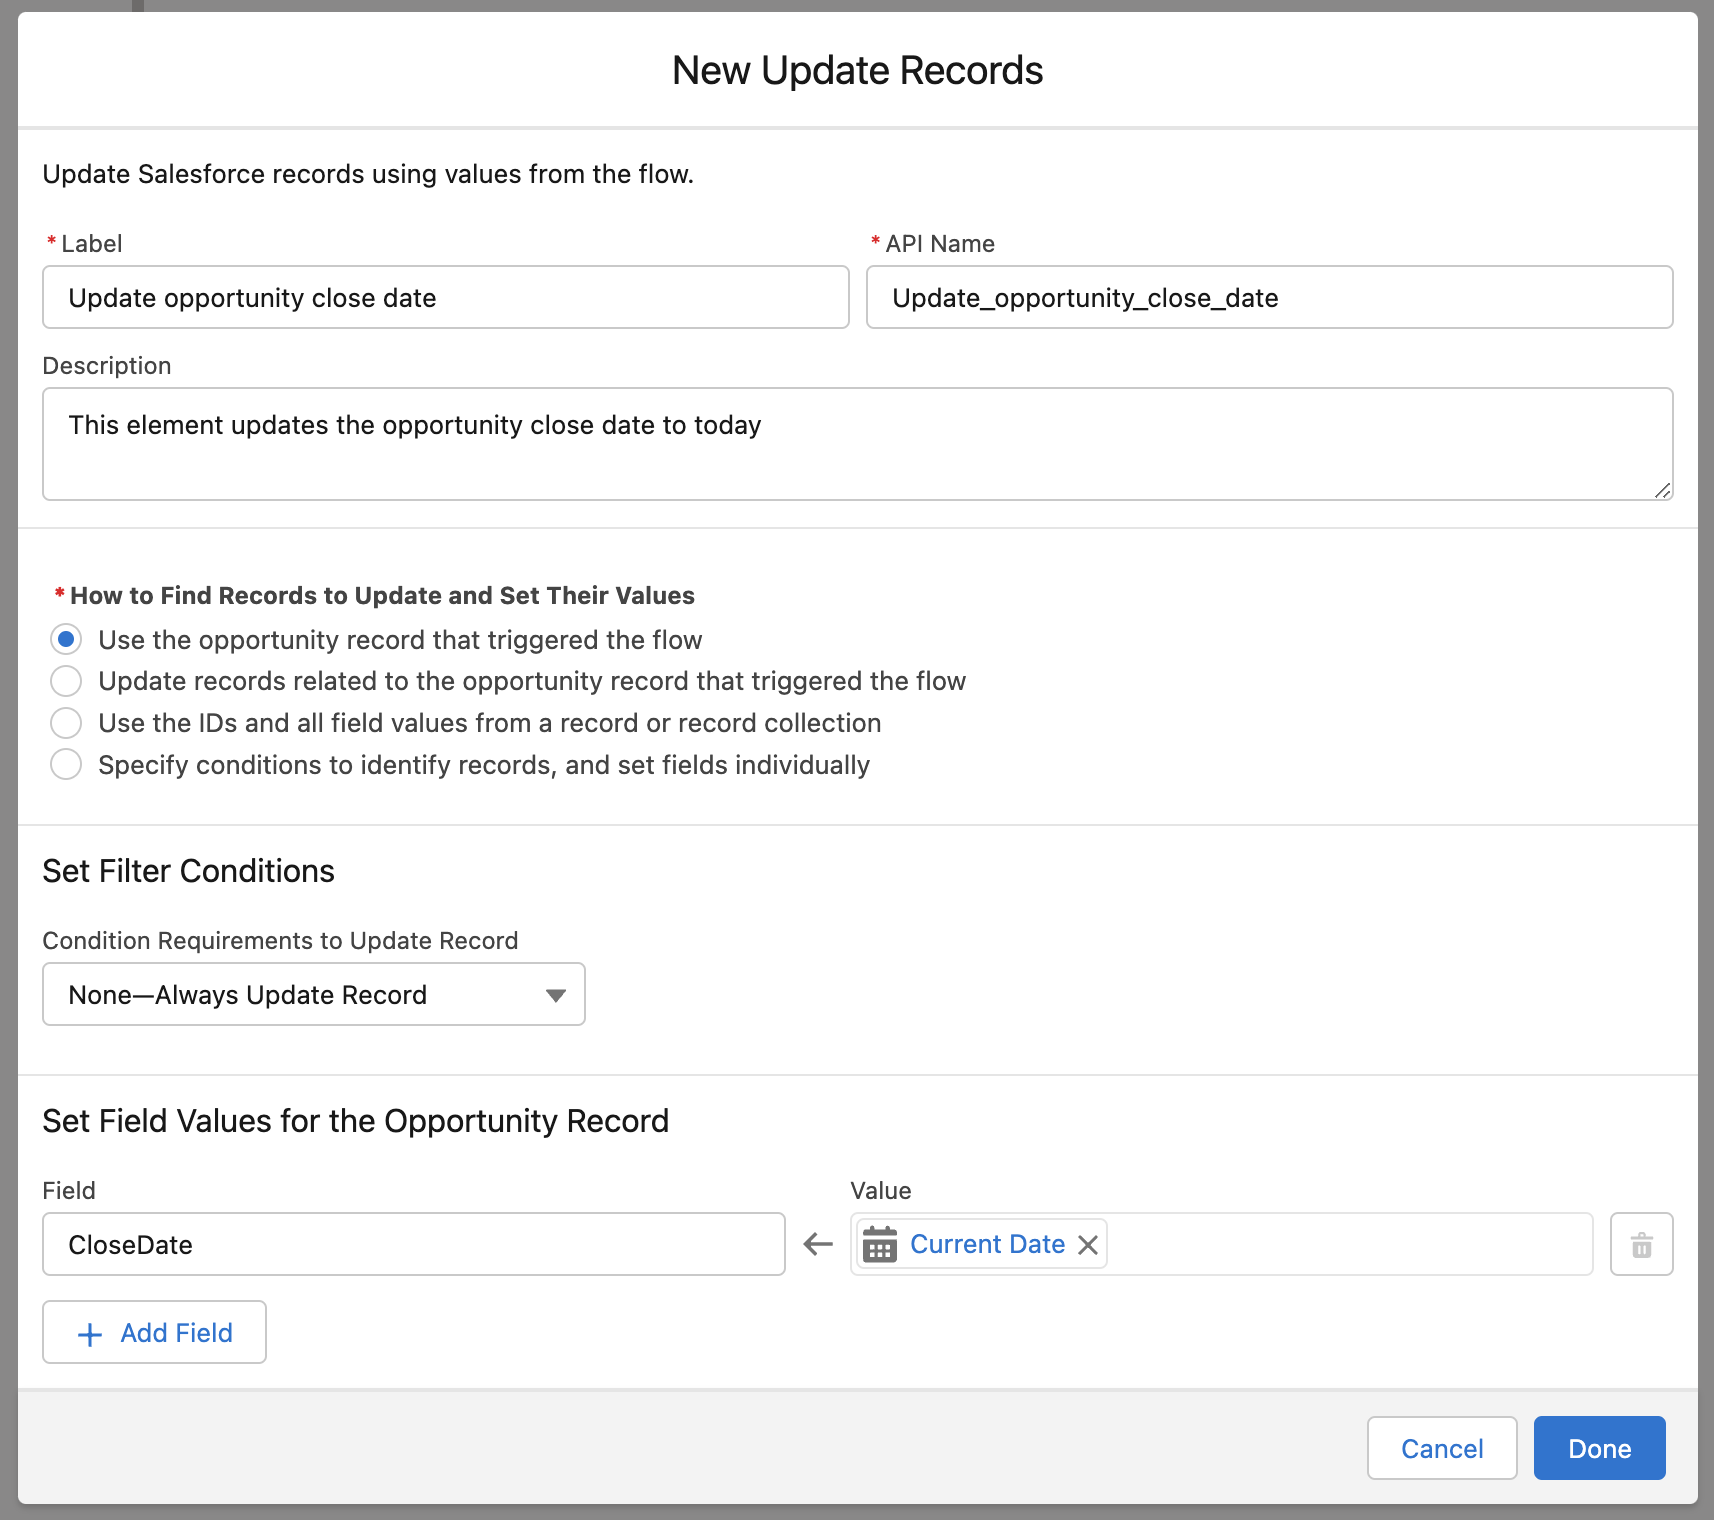
• Label: Update opportunity close date
• Description: This element updates the opportunity close date to today
• How to Find Records to Update and Set Their Values: Use the opportunity record that triggered the flow
• Set Filter Conditions: None-Always Update Record
• Set Field Values for the Opportunity Record: CloseDate = Flow > Current Date
Step 2: Add Scheduled paths
2.1 Create the first scheduled path to send a follow-up to the customer 2 days after an opportunity is closed in Salesforce:
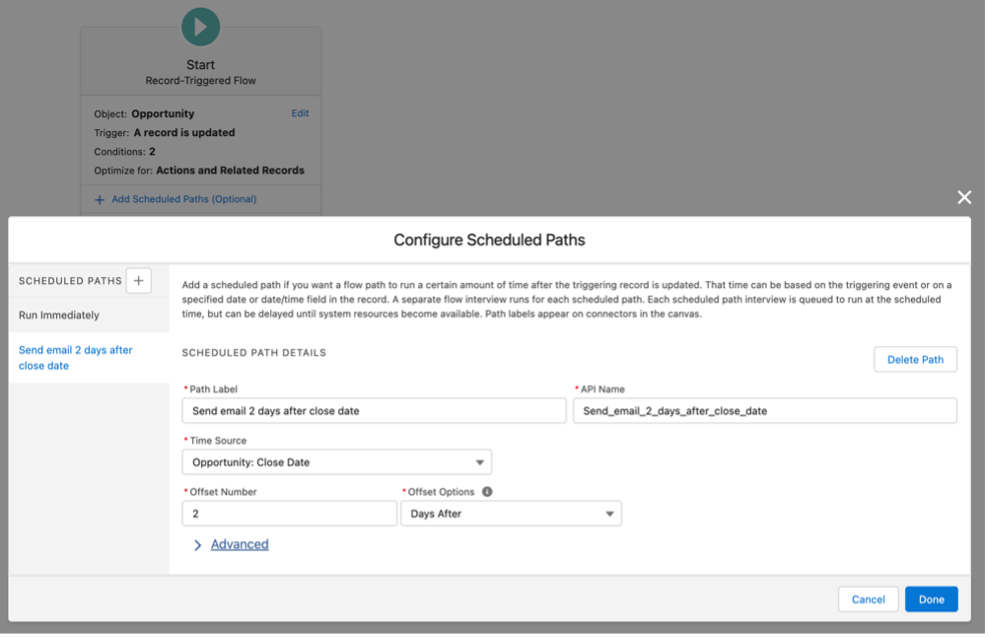
• Label: Send email 2 days after close date
• Time Source: Opportunity: Close Date
• Offset Number: 2
• Offset Options: Days After
2.2 Add a ‘Get’ element to the canvas to retrieve contact roles on the opportunity that will receive the follow-up (depends on your requirements, but here we are retrieving one contact with the Opportunity Contact Role = Decision Maker connected to the opportunity that triggered the flow):
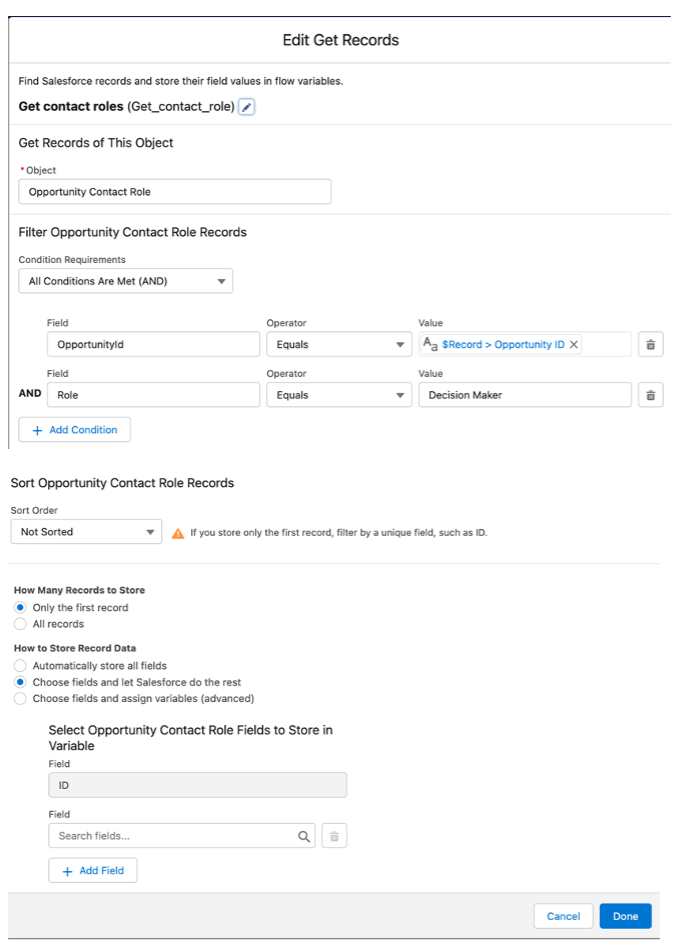
• Object: Opportunity
• Label: Get Contact Roles
• Object: Opportunity Contact Role
• Description: This element gets all Opportunity Contact Roles related to the Opportunity
• Condition Requirements: All Conditions Are Met (AND)
• Field: OpportunityId = Value: {!$Record.Opportunity Id}
• Field: Role = Value: Decision Maker
• How Many Records to Store: Only the first record
• How to Store Record Data: Choose fields and let Salesforce do the rest
• Field: Contact Id
2.3 Add an ’Assignment’ element to the canvas with the following configuration:
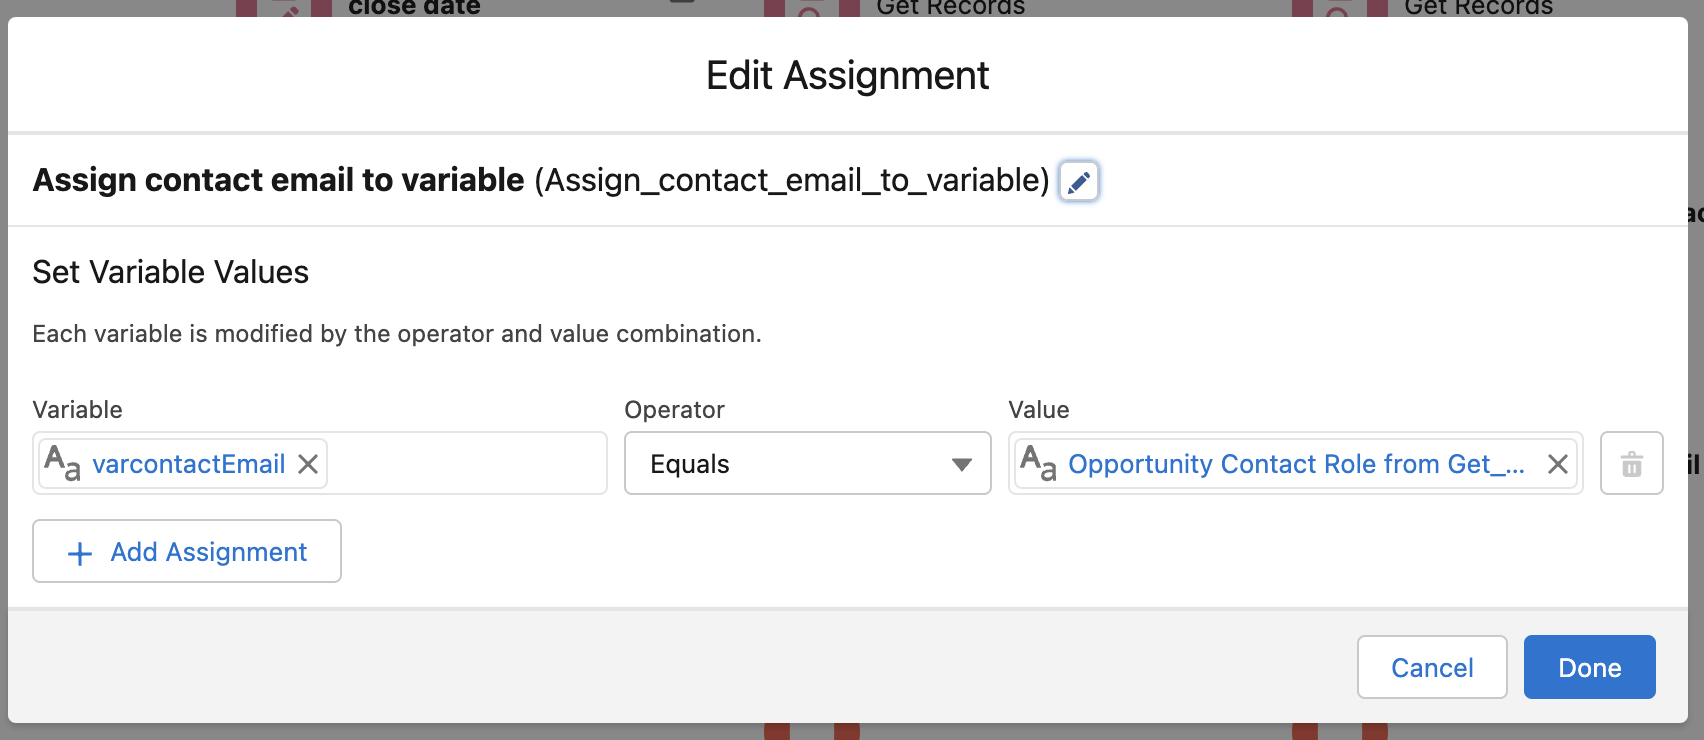
• Label: Assign contact email to variable
• Description: This element assigns the contact email to a variable that will store this data.
• Variable: {!varcontactEmail}
• Operator: Equals
• Value: {!Get_contact.role} > Contact ID > Contact Email
2.4 Add an email action to the canvas with the following configuration:
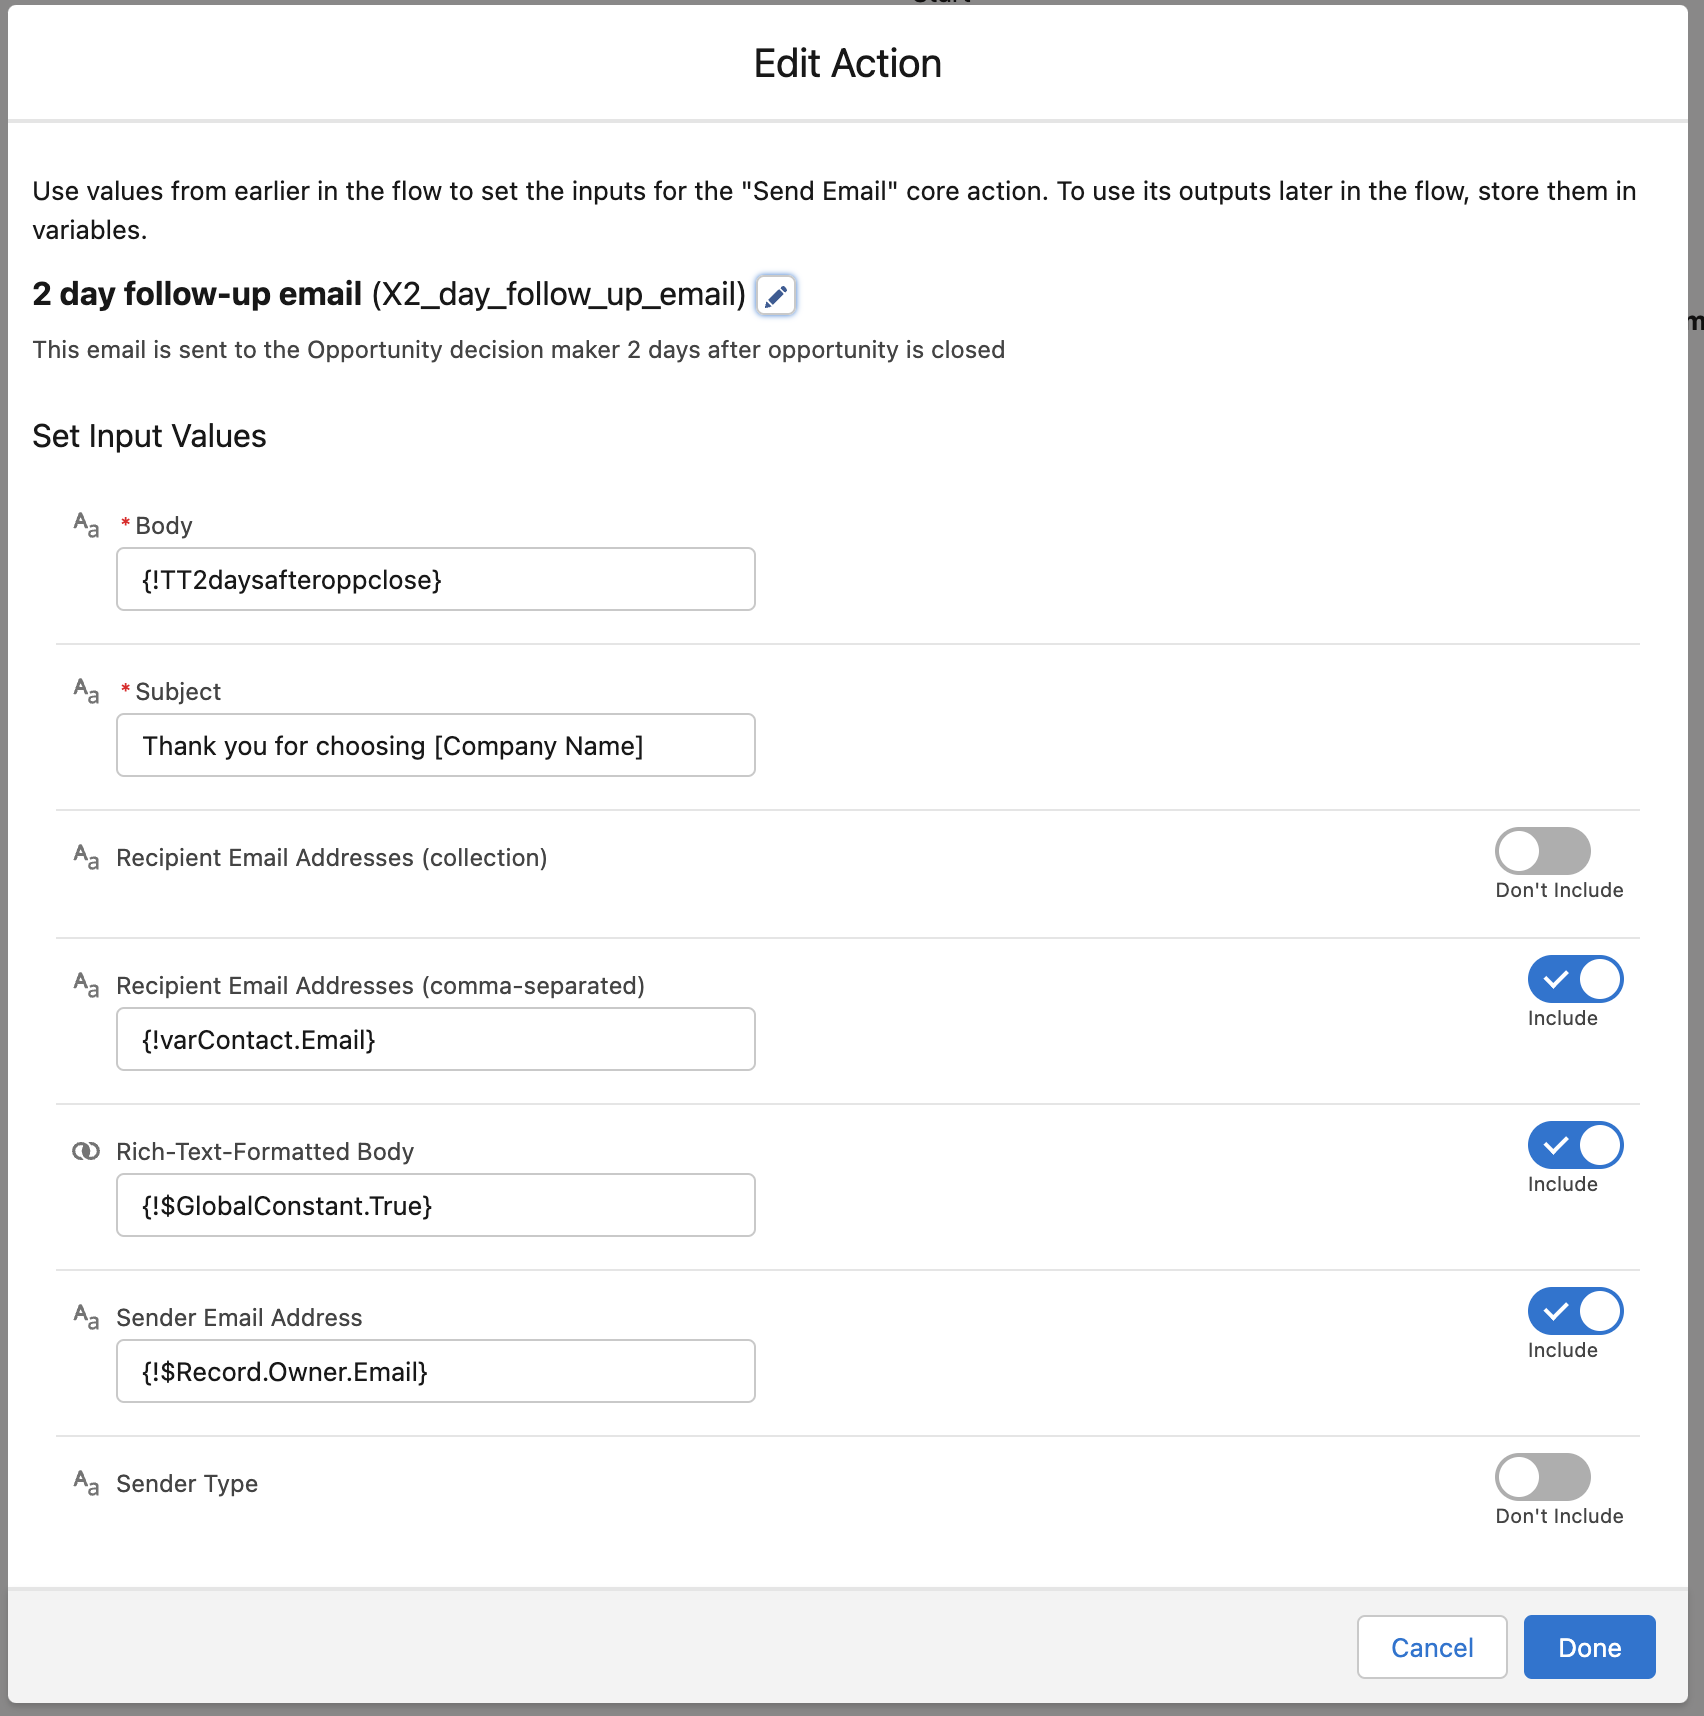
• Label: 2 day follow-up email
• Description: This email is sent to the Opportunity decision maker 2 days after opportunity is closed
• Body: Select the ’2_day_follow_up_email’ text template resource
• Subject: Thank you for choosing [Company Name]
• Recipient Email Addresses (collection): Don’t Include
• Recipient Email Addresses (comma-separated): {!varContact.Email}; Include
• Rich-Text-Formatted Body: {!$GlobalConstant.True }; Include
• Sender Email Address: {!$Record.Owner.Email}; Include
2.5 Create another scheduled path to send out a customer survey 30 days after an opportunity is closed:
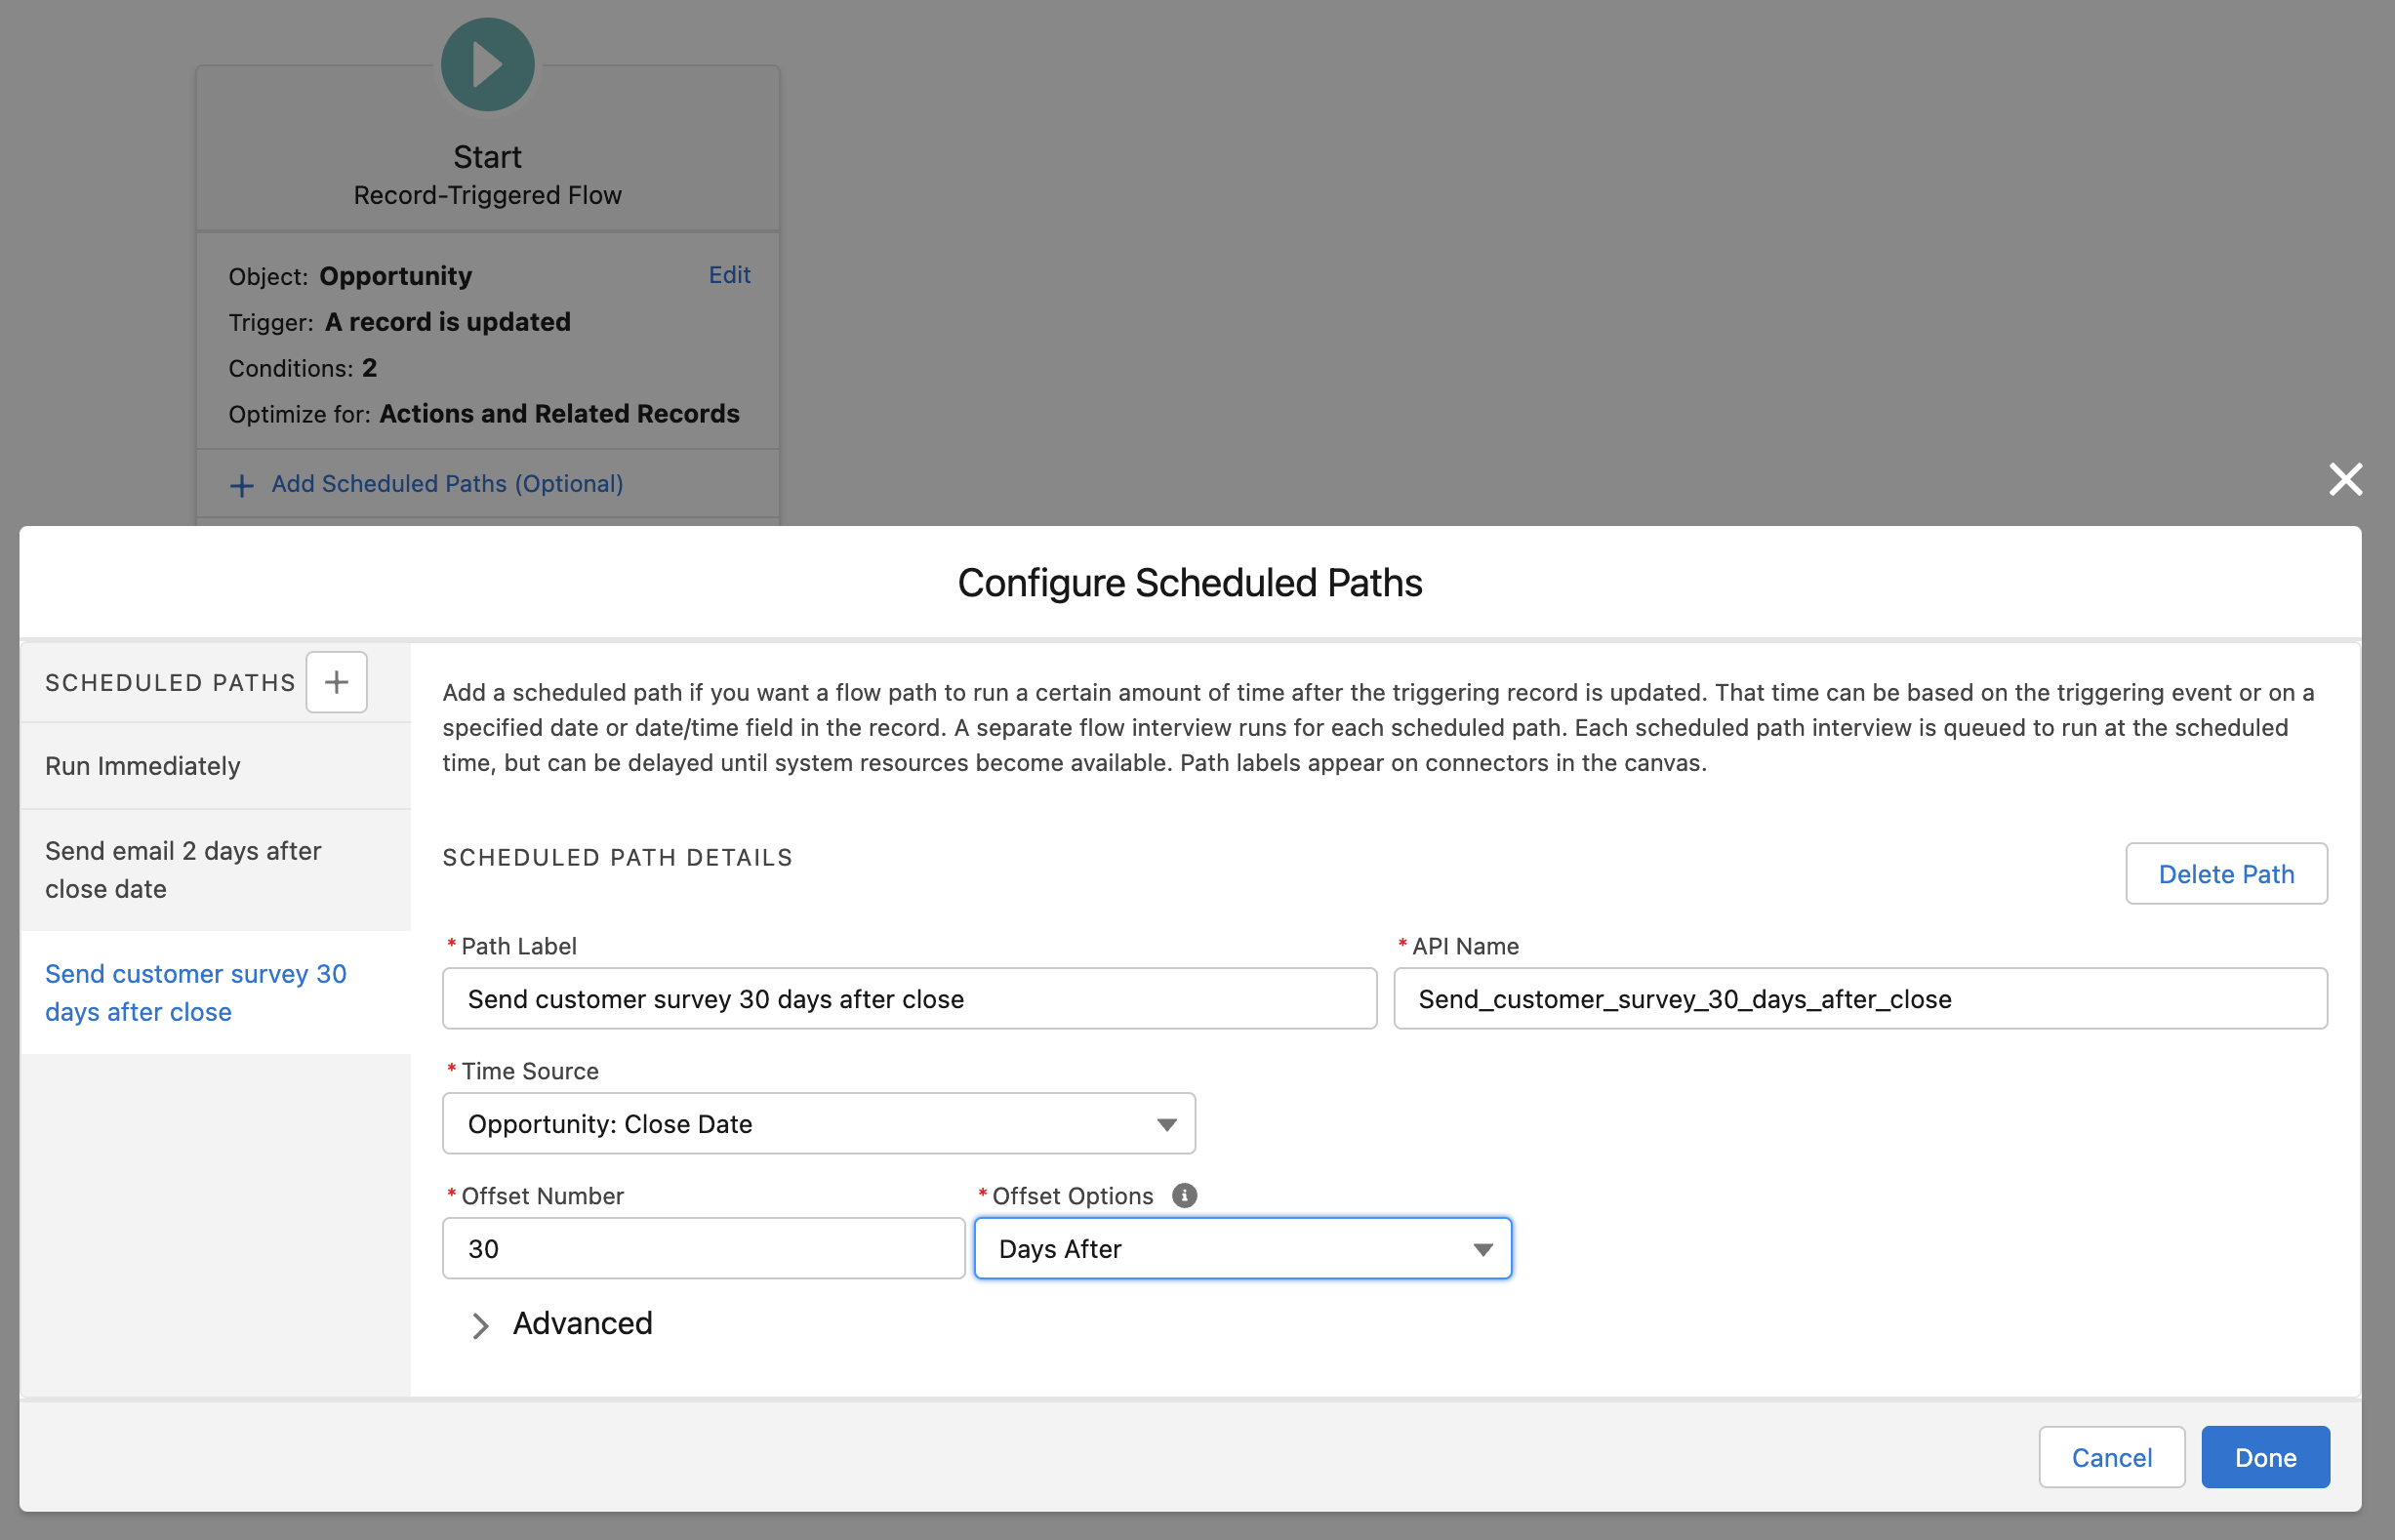
• Label: Send customer survey 30 days after close date
• Time Source: Opportunity: Close Date
• Offset Number: 30
• Offset Options: Days After
2.6 Add a 'Get' Element as described above, with the following configuration:
• Object: Opportunity
• Label: Get Contact Roles 2
• Object: Opportunity Contact Role
• Description: This element gets all Opportunity Contact Roles related to the Opportunity
• Condition Requirements: All Conditions Are Met (AND)
• Field: OpportunityId = Value: {!$Record.Opportunity Id}
• Field: Role = Value: Decision Maker
• How Many Records to Store: Only the first record
• How to Store Record Data: Choose fields and let Salesforce do the rest
• Field: Contact Id
2.7 Add an 'Assignment' element as above, with the following configuration:
• Label: Assign contact email to variable 2
• Description: This element assigns the contact email to a variable that will store this data.
• Variable: {!varcontactEmail}
• Operator: Equals
• Value: {!Get_contact.role_2} > Contact ID > Contact Email
2.8 Add an email action to the canvas with the following configuration:
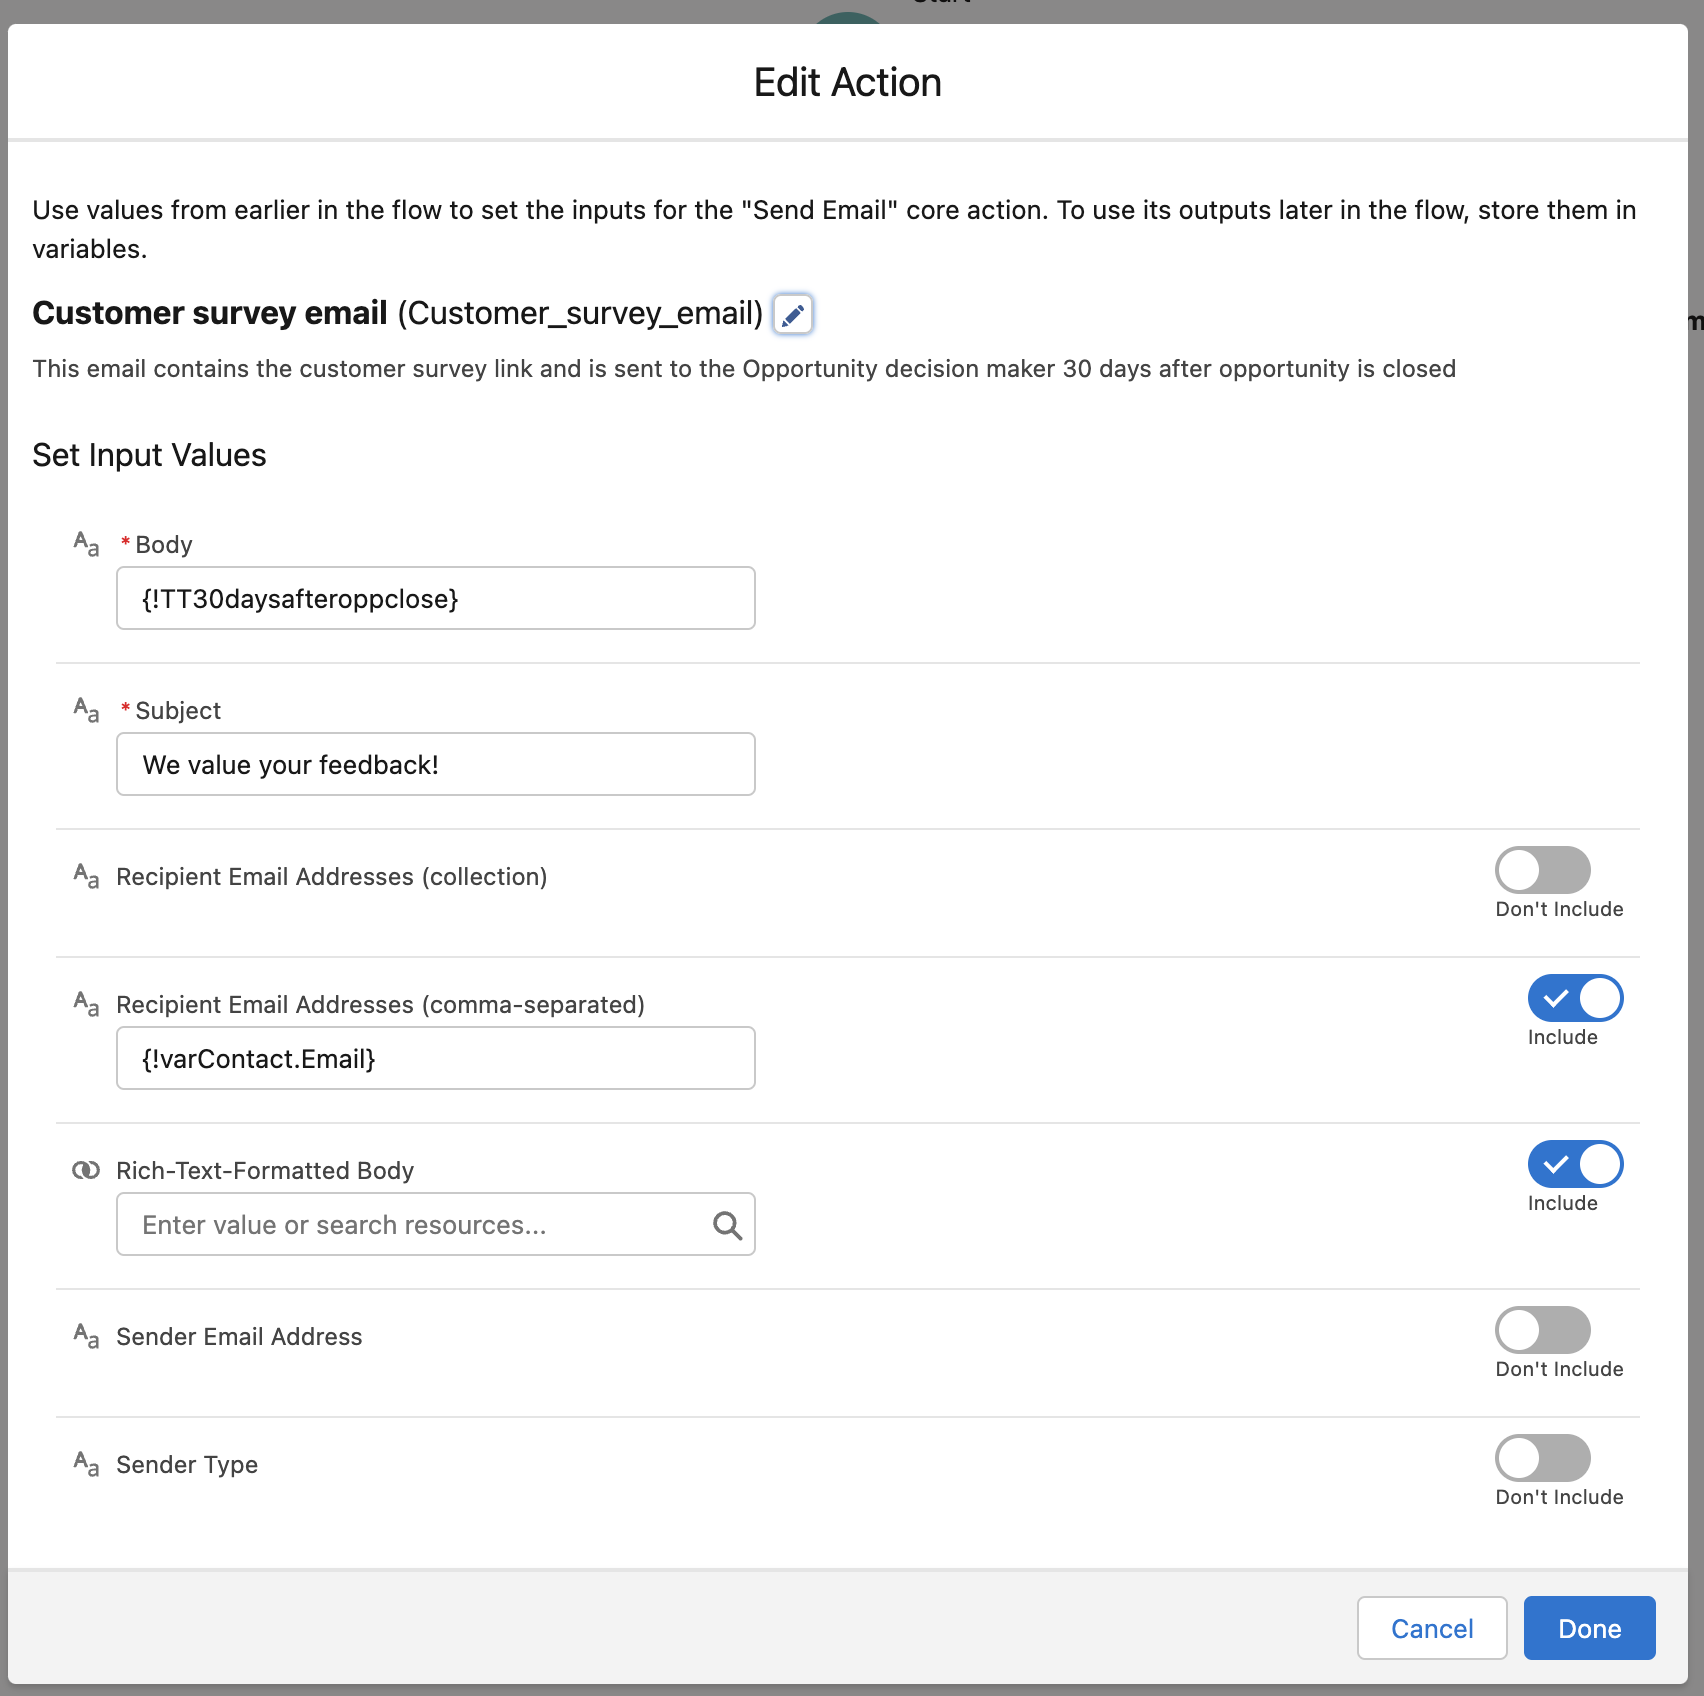
• Label: Customer survey email
• Description: This email is sent to the Opportunity decision maker 30 days after opportunity is closed with customer survey link
• Body: Select the {!Customer_survey_email } text template resource
• Subject: We value your feedback!
• Recipient Email Addresses (collection): Don’t Include
• Recipient Email Addresses (comma-separated): {!varContact.Email}; Include
• Rich-Text-Formatted Body: {!$GlobalConstant.True }; Include
• Sender Email Address: support@yourcompany.com; Include
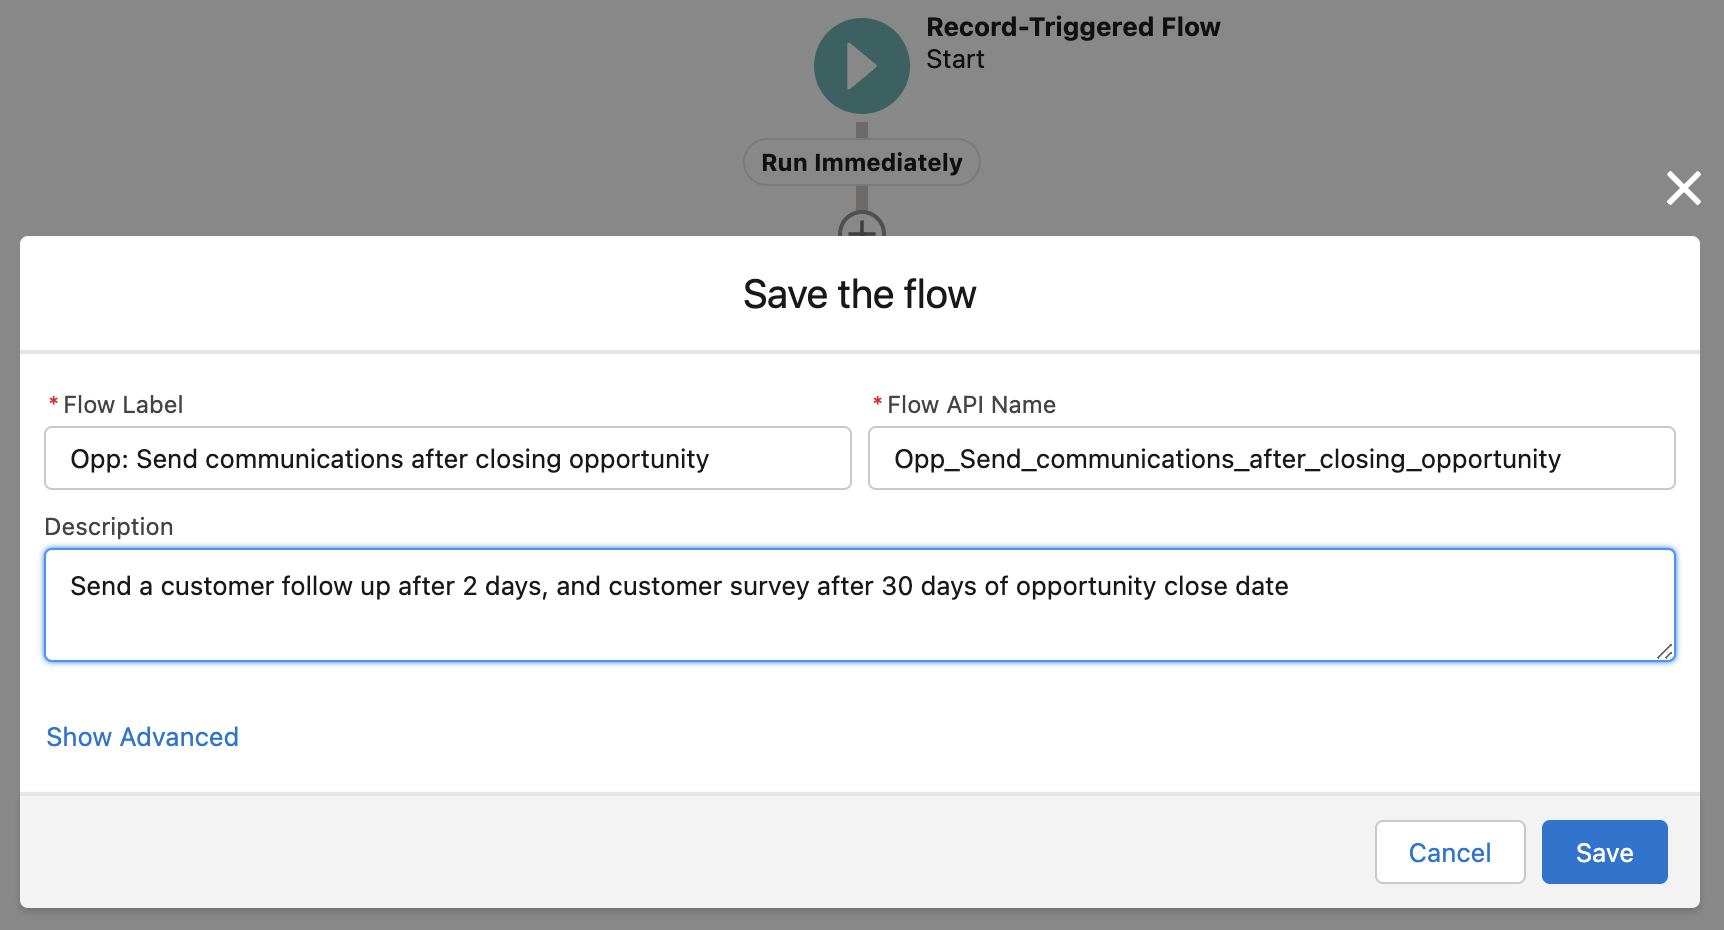
2.9. Save the Flow and name it ‘Update Service Interests on Contact’ and activate the Flow:
Questions about Salesforce and optimising it for your sales process? Get in touch for a 1-on-1 consultation:
Related Content:
Checkout these step-by-step guides to achieve more productivity & process automation with your Salesforce instance:
- Automate date entry with Multi-picklist field in Salesforce flow
- Bulletproof your ROMI reporting in Salesforce